Shop-E-Business User Manual: Step-by-Step Guide from Register to Login, Products, /landingpage, /buy and Themes (10 USD/year)
Launch your e-commerce store effortlessly with Shop-E-Business .
Get a complete online storefront with unlimited product uploads for just $10/year, backed by a 3-day free trial.
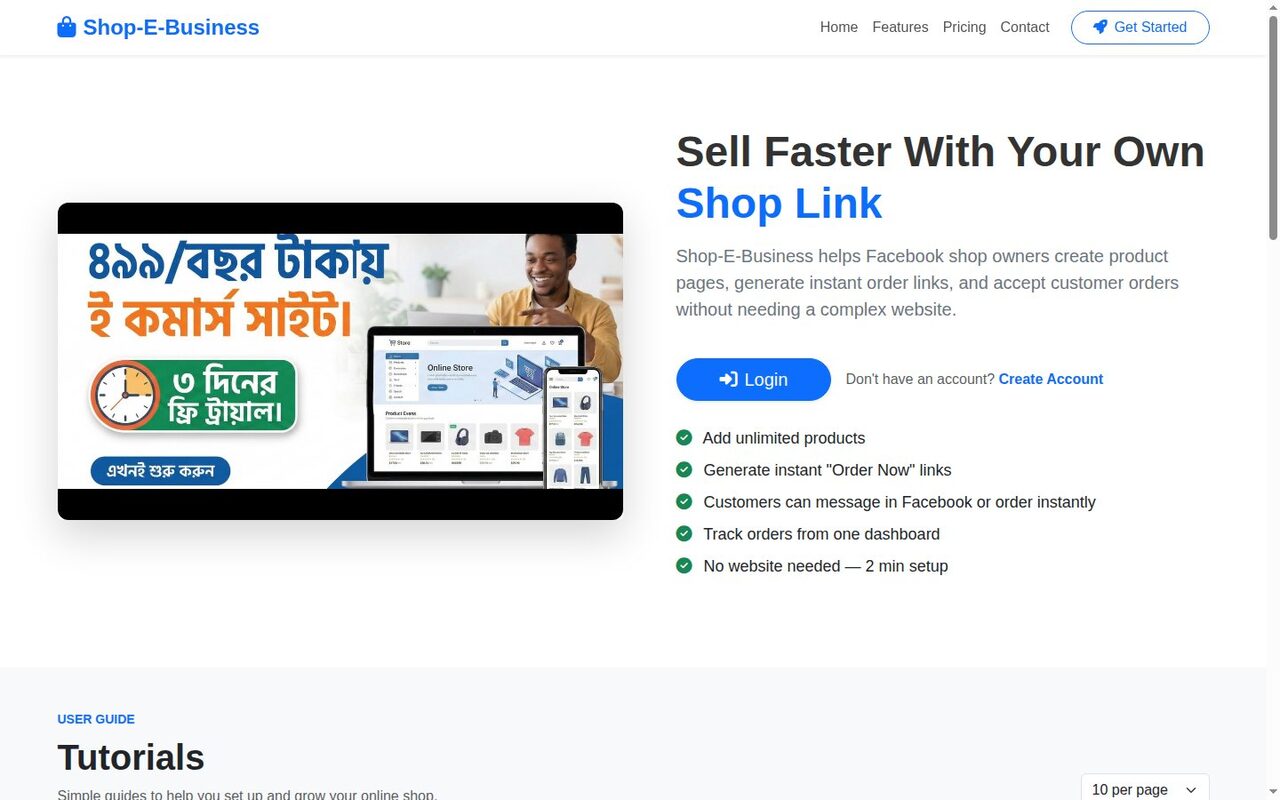
🎬 Watch the step-by-step video below to see how easily you can set up your storefront on Shop-E-Business!
This is the complete, screenshot-by-screenshot user manual for Shop-E-Business We walked through the platform exactly as a new international merchant would — from registering a brand-new shop called Nordic Craft Store to selling a handmade ceramic mug, confirming the order and switching the storefront theme. Every screenshot below comes from a real session.
International Plan · 10 USD / year
One flat price. Unlimited products, your own store subdomain, three storefront themes, SEO tools, a dedicated /landingpage and one-click /buy pages, plus order management. Every new shop starts with a free trial, so you can complete this whole manual before paying anything.
How to read this manual. Each numbered section is one feature of the platform, in the order you will use it. Menu names in bold are the exact labels you will see in the admin sidebar: Dashboard, Shop Info, Upload Product, Products, Orders, Delivery Charge, Product Size, Product Slug URL, SEO Metatags, Manage Category, Theme and Logout. Storefront URLs are written as yourstore.shopebusiness.com/… — replace yourstore with your own shop domain name.
Table of Contents
- Register a New Shop
- Log In to the Admin Panel
- Trial, Subscription and the 10 USD/year Plan
- Shop Info — Branding
- Manage Category
- Upload Product (with a Long Description)
- Product Size / Variants
- Products List and Product Status
- Product Slug URL —
/Product/View/{id}vs/{slug-url} - SEO Metatags
- Delivery Charge
- Orders and Order Status
- The Customer Storefront: Home,
/landingpage, Product Page, Cart and Checkout - The
/buyPage — One-Click Ordering - Themes: Classic, Grocery Inspired and Fashion Luxe (Home,
/landingpage, Product and/buyin each) - Password Reset via OTP
- Dashboard Overview
- Logout
1. Register a New Shop
Open the Shop-E-Business home page. The hero section explains the offer; click Create Account (or scroll to the Create Your Shop panel).
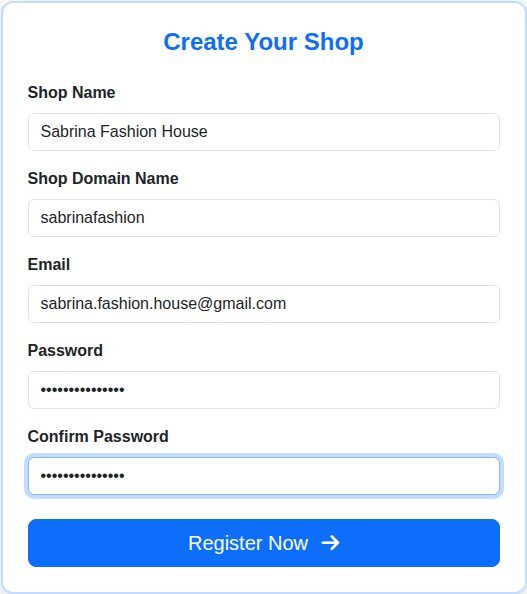
- Shop Name — your brand name exactly as customers will see it in the storefront header (for example Sabrina Fashion House).
- Shop Domain Name — one short lowercase word. It becomes your permanent store address,
yourstore.shopebusiness.com. Availability is checked while you type. - Email — used for login and for password-reset OTP codes, so use a real inbox you control.
- Password and Confirm Password — at least 8 characters with a mix of letters, numbers and symbols.
- Click Register Now. Your shop is created instantly with an active trial.
SEO tip: The domain name cannot be changed later and it appears in every product URL, so keep it short, brandable and memorable —soleis better thansole-fashion-store-2026.
2. Log In to the Admin Panel
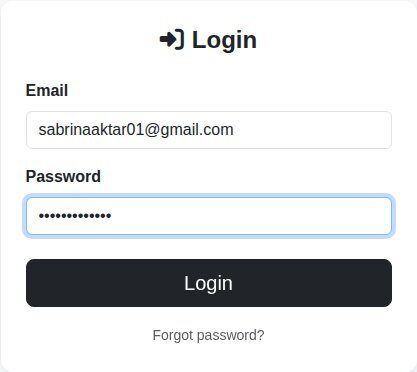
Click Login in the top navigation, enter the same Email and Password you registered with and press Login. A Forgot password? link sits directly under the form (see section 16).
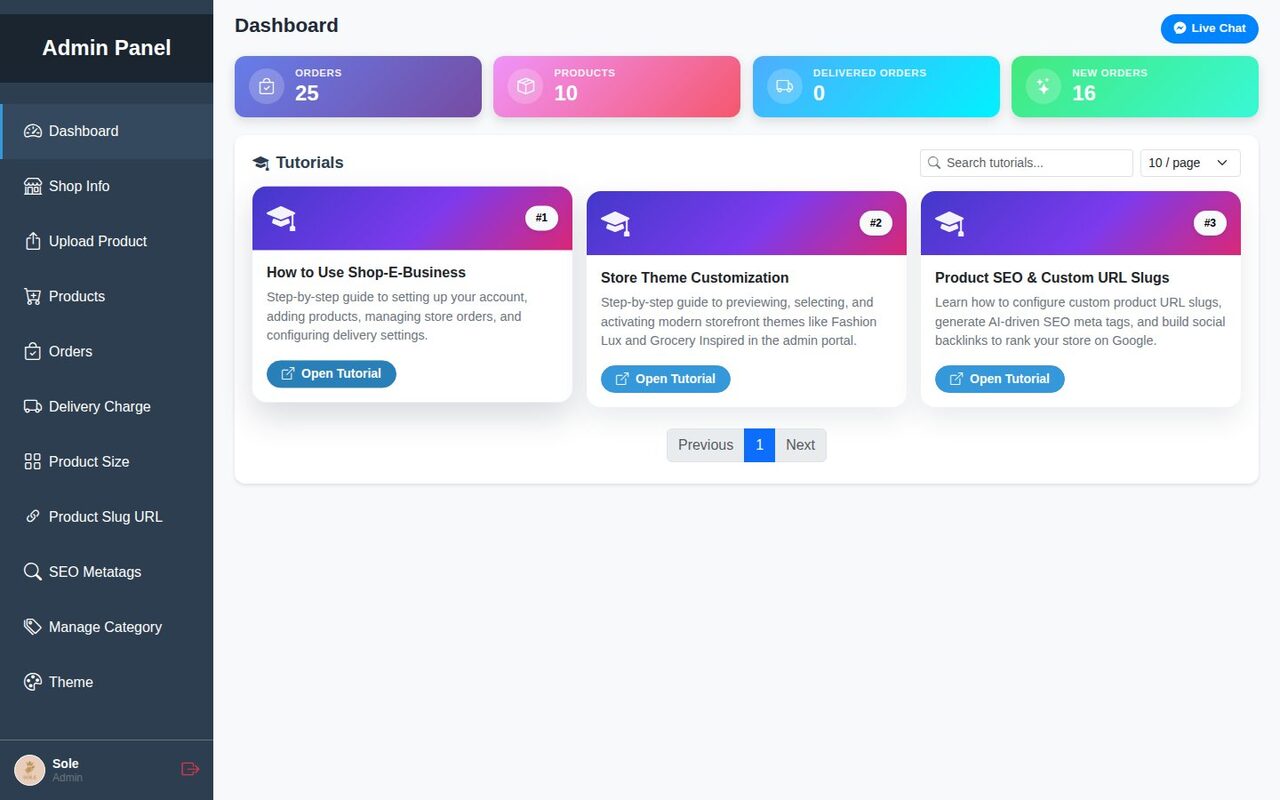
After a successful login you land on the Dashboard. The left sidebar is your Admin Panel: every feature in this manual is one click away from here.
3. Trial, Subscription and the 10 USD/year Plan
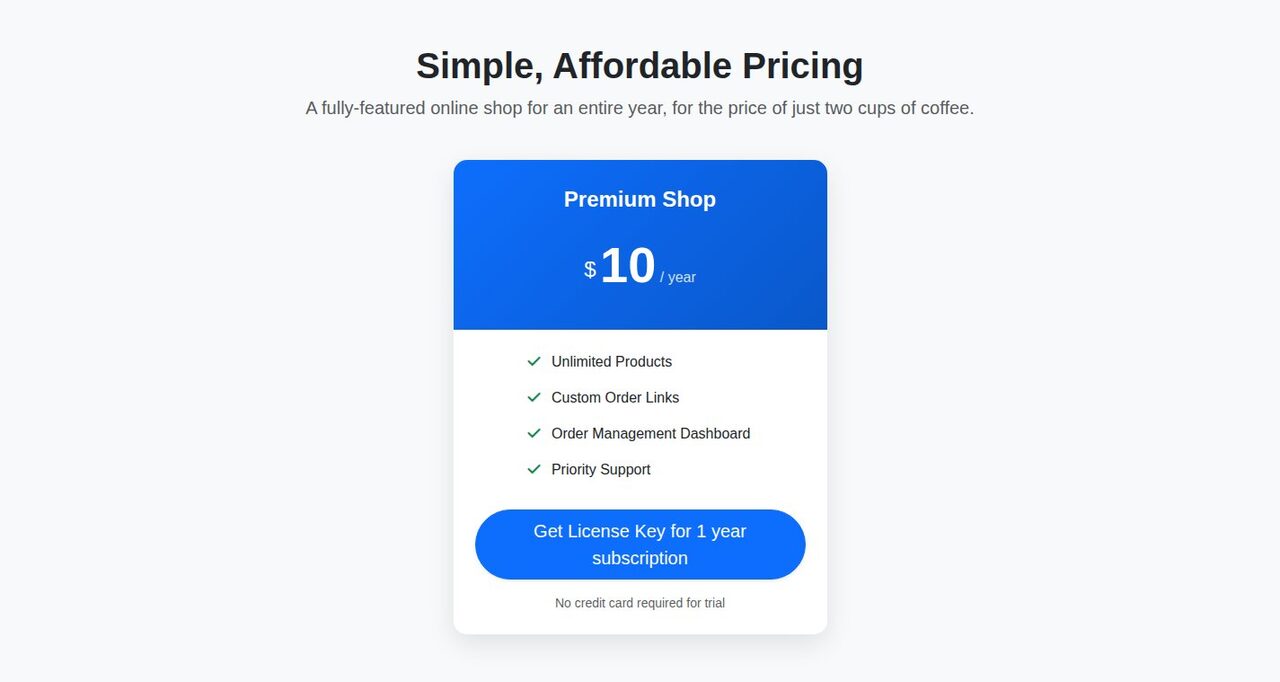
Every new shop starts with an active trial, so the full sidebar (products, orders, themes…) is available immediately. The Pricing section on the home page shows the international Premium Shop plan at $10 / year: unlimited products, custom order links, an order management dashboard and priority support. No credit card is required to start.
Inside the admin panel, the top-right badge shows your current plan and how many days remain. When the trial ends, only Dashboard and Shop Info stay visible until you activate a license key — your products and orders are kept, nothing is deleted.
4. Shop Info — Branding
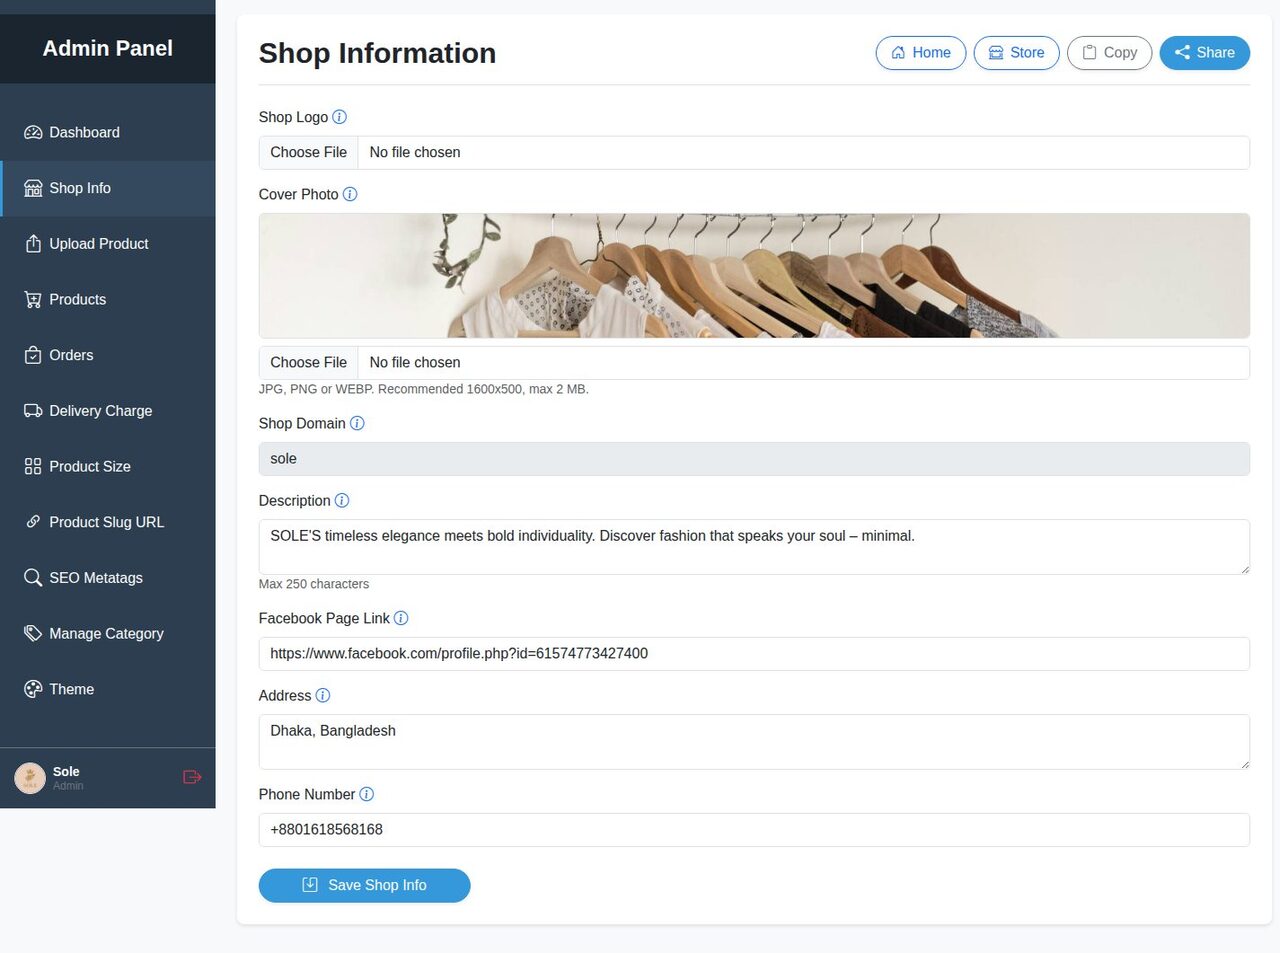
Go to Shop Info. This page controls everything customers see in the storefront header, hero area and footer of every theme.
- Shop Logo — a square PNG/JPG. Appears in the storefront header and on the checkout page.
- Cover Photo — a wide banner used as the hero image on the storefront home page and
/landingpage. - Shop Domain — read-only reminder of your
yourstore.shopebusiness.comaddress. - Description — one or two sentences about what you sell (ours: “SOLE'S timeless elegance meets bold individuality…”). Shown under the shop name and used as the default meta description.
- Facebook Page Link — powers the Facebook and Chat buttons on the storefront.
- Address and Phone Number — shown in the footer/contact area and in the top info bar.
- Click Save Shop Info. The View and Share buttons at the top open or share your live store link.
Tip: Use a phone number in international format (for example +880 …) so overseas customers can call or WhatsApp you directly from the storefront.
5. Manage Category
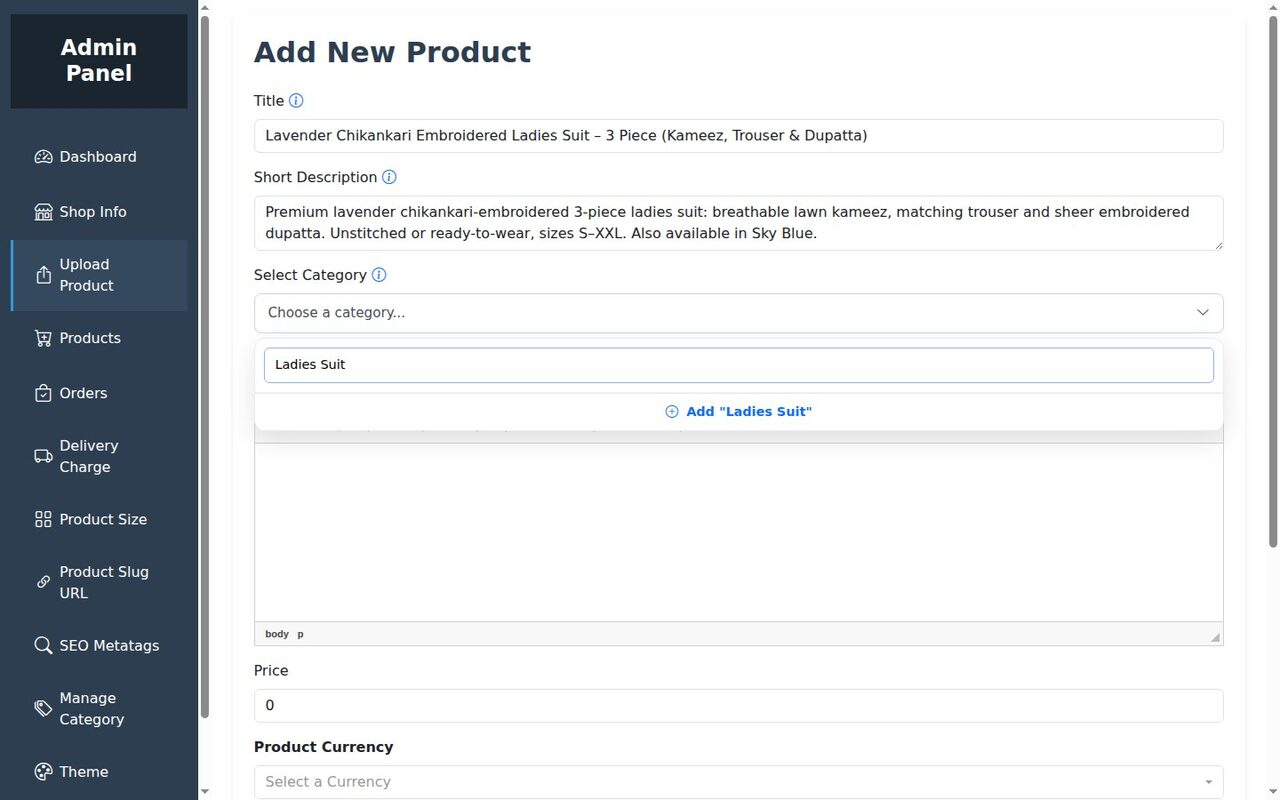
You can create a category right inside the Upload Product form: open the Select Category dropdown, type a new name (we typed Ladies Suit) and click Add “Ladies Suit”. The category is saved instantly and selected for the product.
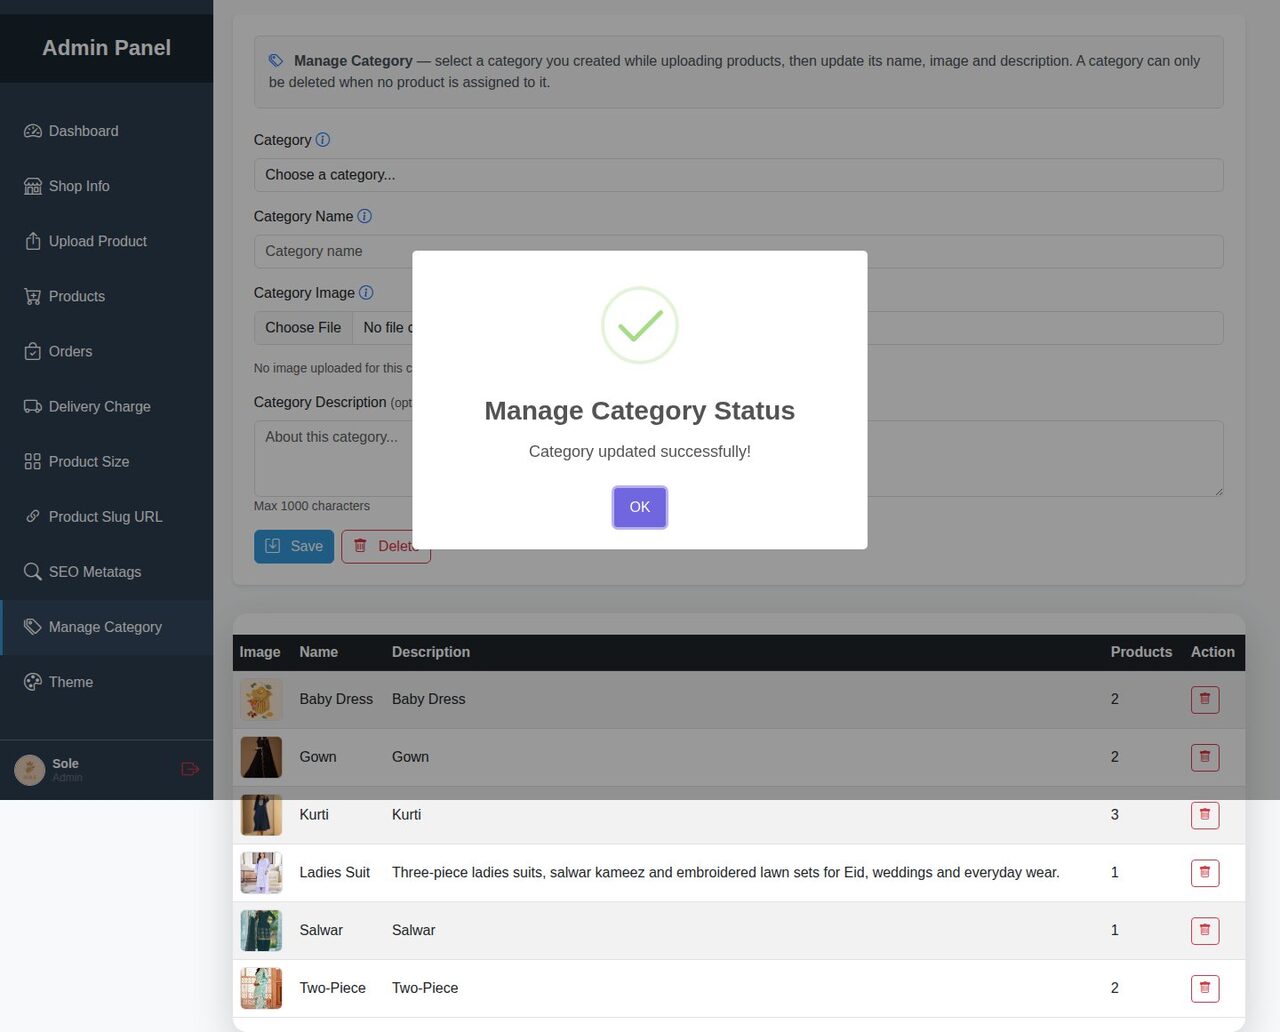
The Manage Category page lists every category with its image, name, description and product count. Here you can rename a category, add a description and upload a category image — these images appear in the Shop by Category section of the storefront and on /landingpage.
Tip: Keep 3–8 broad categories. Customers filter by category in the storefront sidebar, so too many tiny categories make browsing harder and dilute your SEO.
6. Upload Product (with a Long Description)
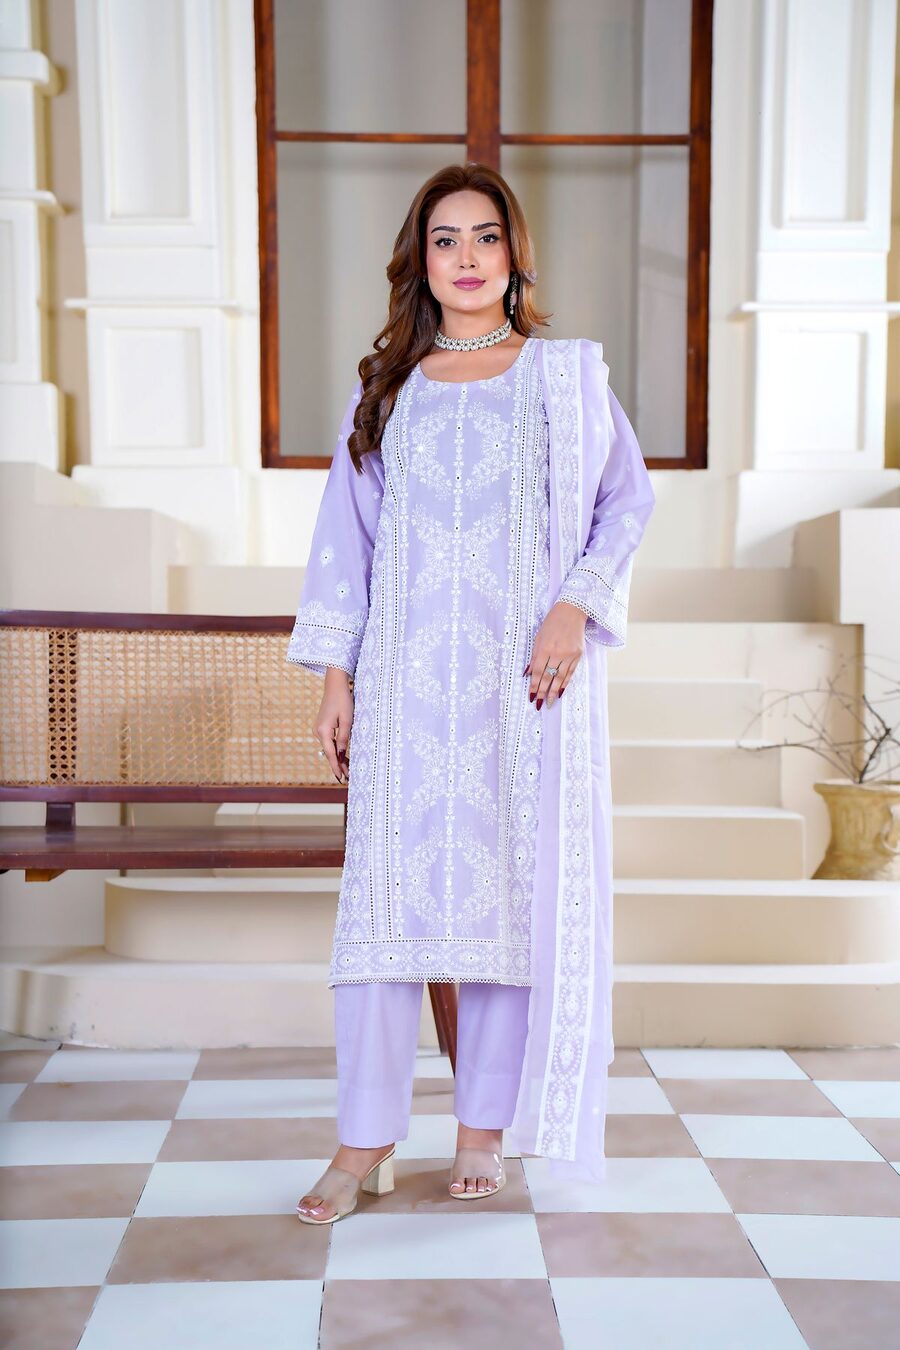
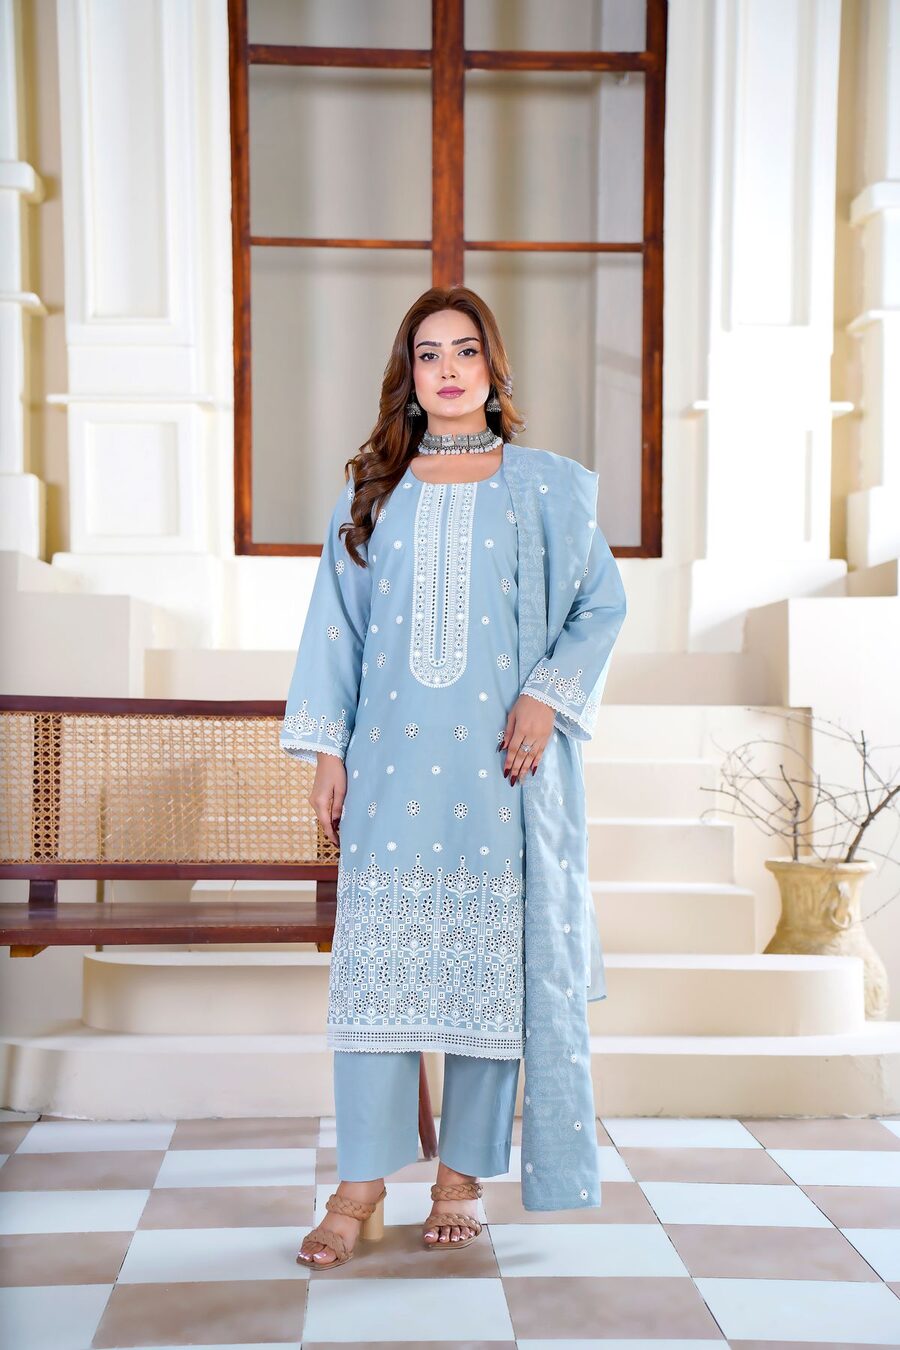
Go to Upload Product. We uploaded a real product — Lavender Chikankari Embroidered Ladies Suit – 3 Piece (Kameez, Trouser & Dupatta) — using these three photos:

Fill in the form from top to bottom:
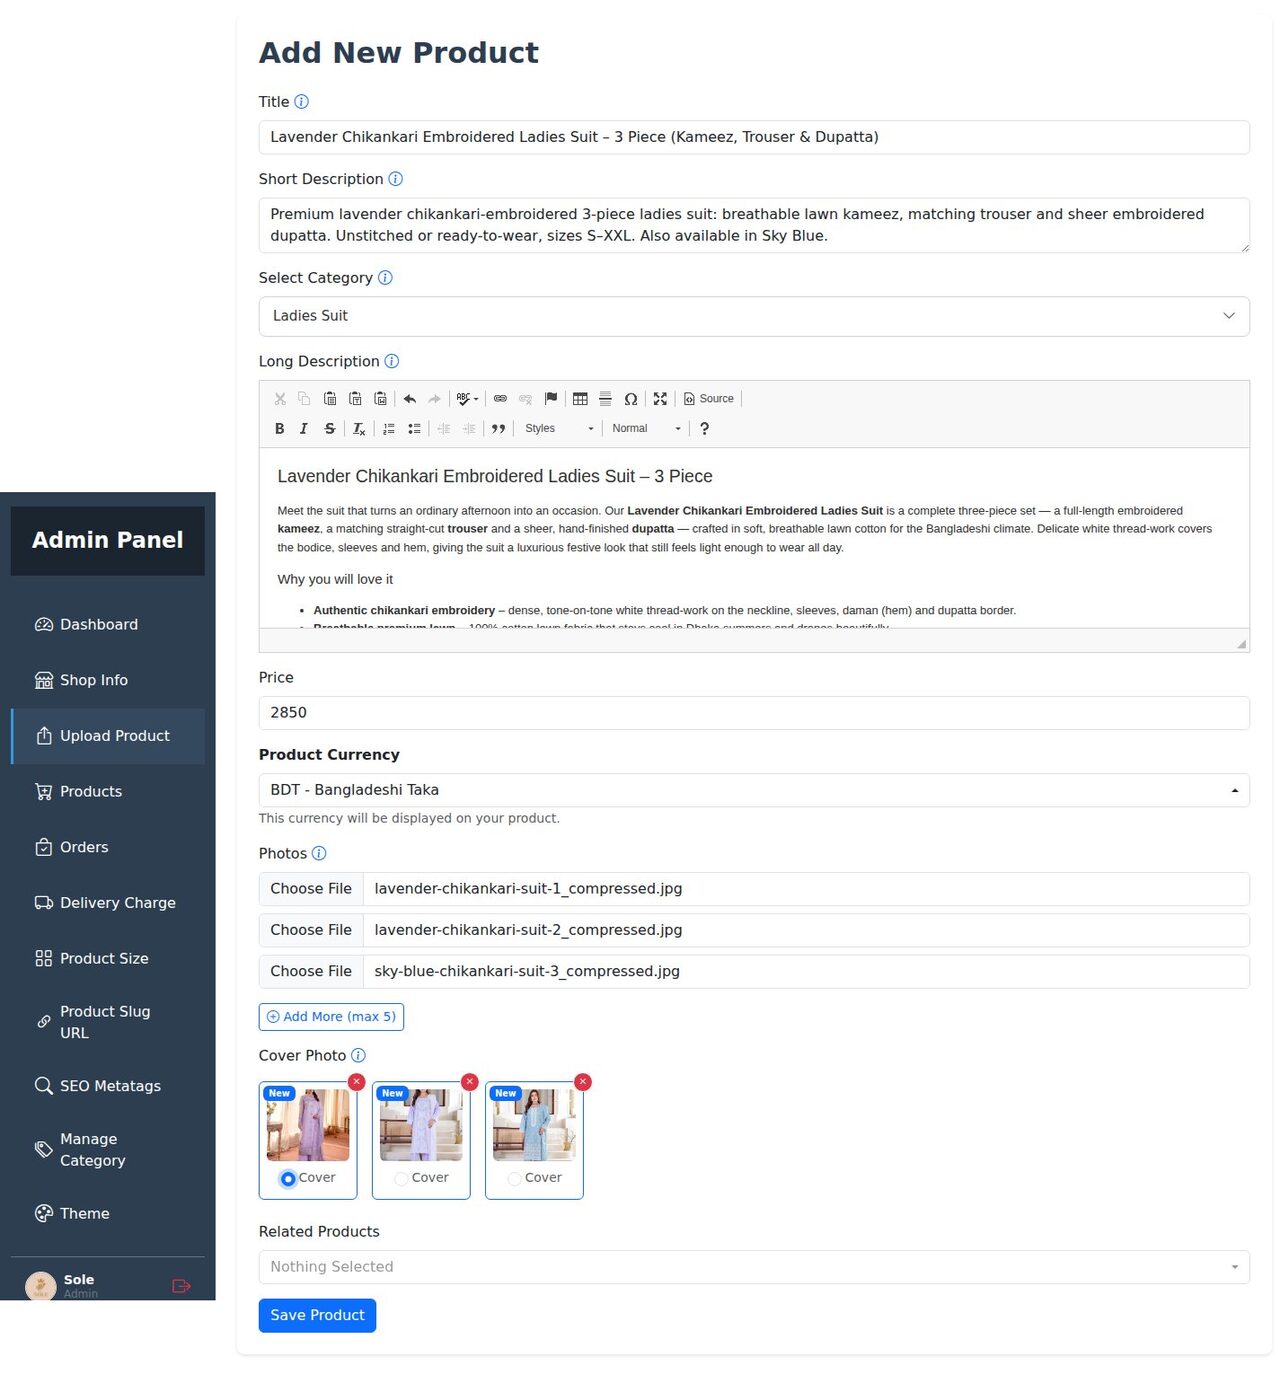
- Title — specific and keyword-rich: fabric, style, pieces and colour. Our title contains Chikankari, Embroidered, Ladies Suit and 3 Piece, which is exactly what shoppers search for.
- Short Description — up to 250 characters. It appears on product cards, on the
/buypage and in the cart, so summarise the product in one strong sentence. - Select Category — pick an existing category or add a new one inline (section 5).
- Long Description — a rich-text editor. Make this big. The long description is rendered in full on the product page (
/Product/View/{id}or/{slug-url}) and on/buy, so a detailed description is what makes those pages look professional and rank in search. We wrote seven sections with headings and bullet lists:- Product overview — what it is and who it is for
- Embroidery & fabric — hand-finished chikankari on breathable lawn cotton
- Complete 3-piece set — kameez, trouser and dupatta measurements
- Size guide — S to XXL plus an Unstitched option
- Styling ideas — casual, office and festive
- Care instructions — cold hand-wash, dry in shade, iron inside-out
- Delivery, cash on delivery & returns
- Price and Product Currency — we entered 2850 and BDT (৳); the symbol is shown with the price everywhere on the storefront.
- Photos — up to 5 images. Click Add More (max 5) for each extra photo and tick one as the Cover Photo; the cover is used on product cards and as the first gallery image.
- Related Products (optional) — cross-sell items shown under the product.
- Click Save Product.
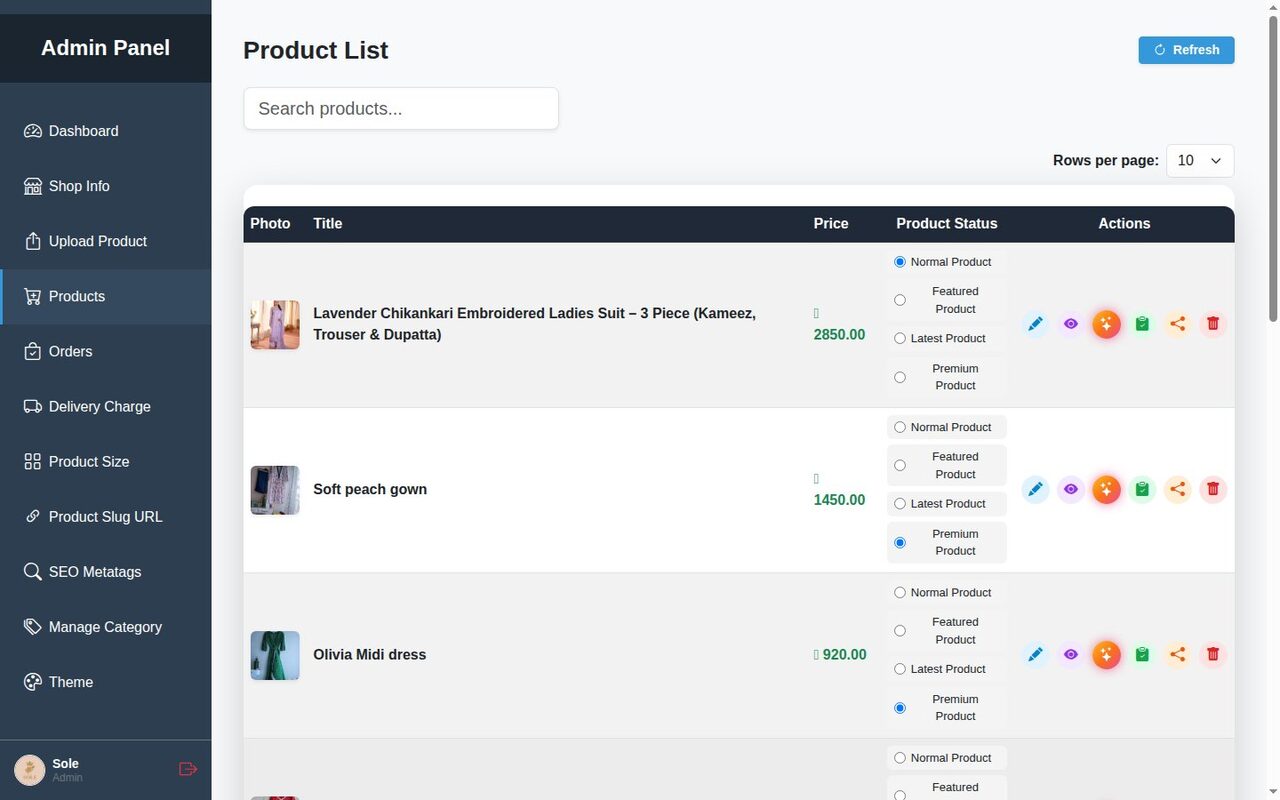
After saving you are redirected to the Products list, where the new suit appears at the top with its cover photo, price and status.
SEO tip: Write the long description for humans first — headings, short paragraphs and bullet lists. Search engines reward pages with 300+ words of unique, well-structured text, and customers who read a complete size guide and care section return fewer items.
7. Product Size / Variants
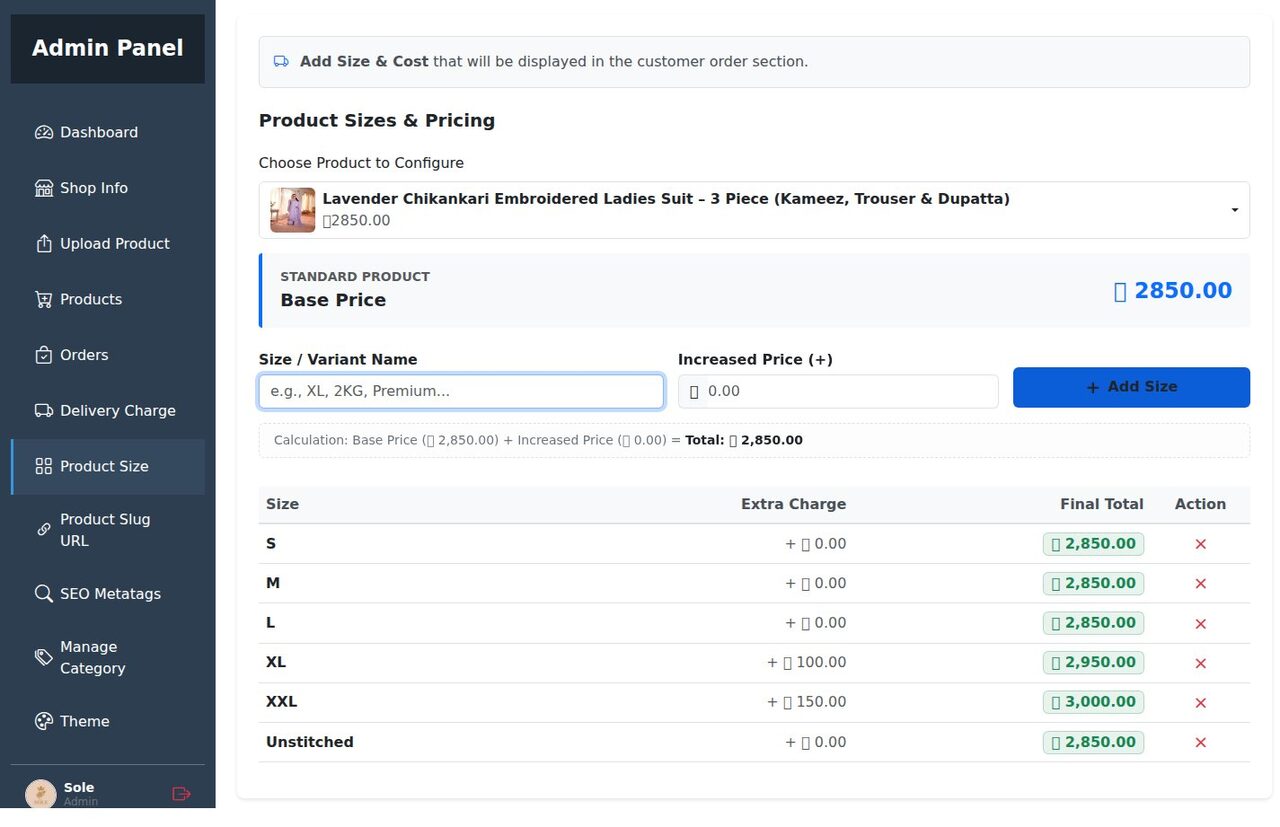
Go to Product Size and pick the product under Choose Product to Configure. The base price is displayed; add each variant with a Size / Variant Name and an Increased Price (+). Use 0 for sizes sold at the base price, a positive number for a surcharge and a negative number for a discount.
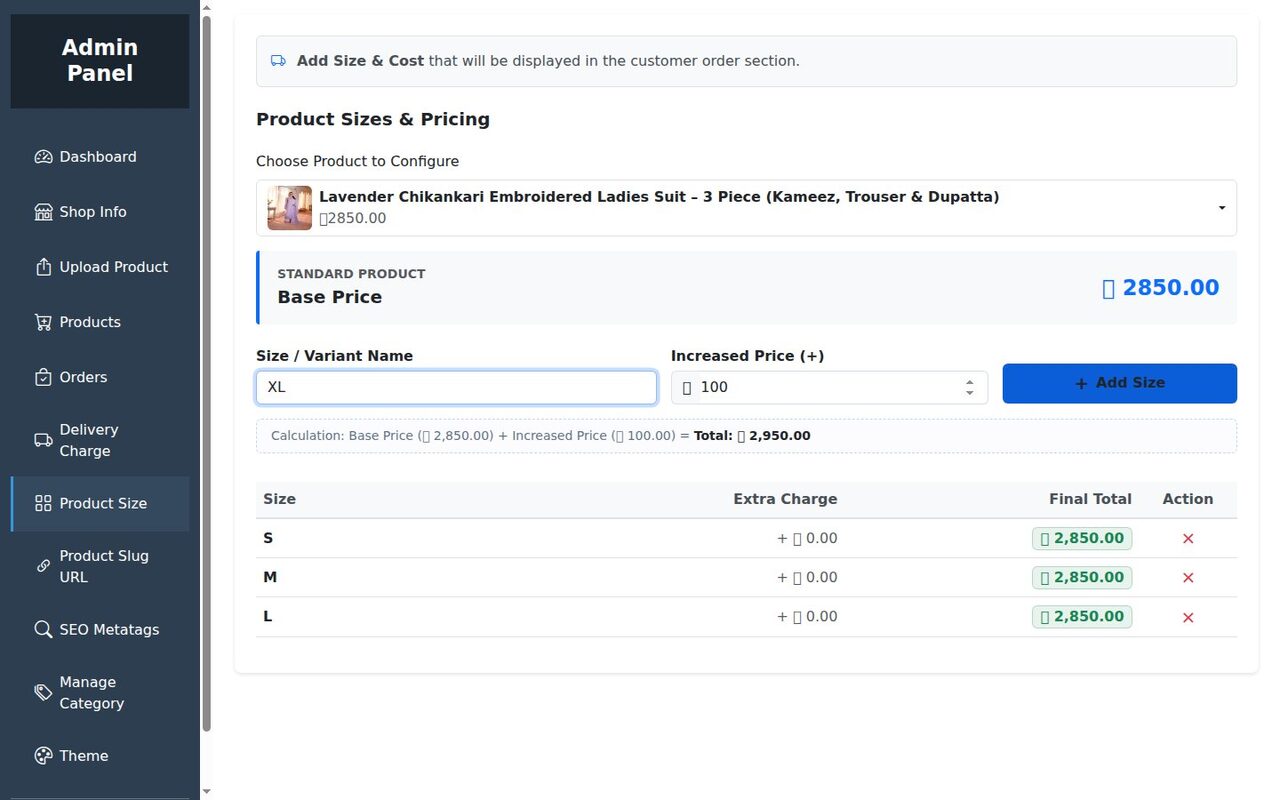
We added S, M, L (+0), XL (+৳100), XXL (+৳150) and Unstitched (−৳200). The table shows the final price of every variant, and these become a required dropdown on the product page, the /buy page and at checkout.
8. Products List and Product Status
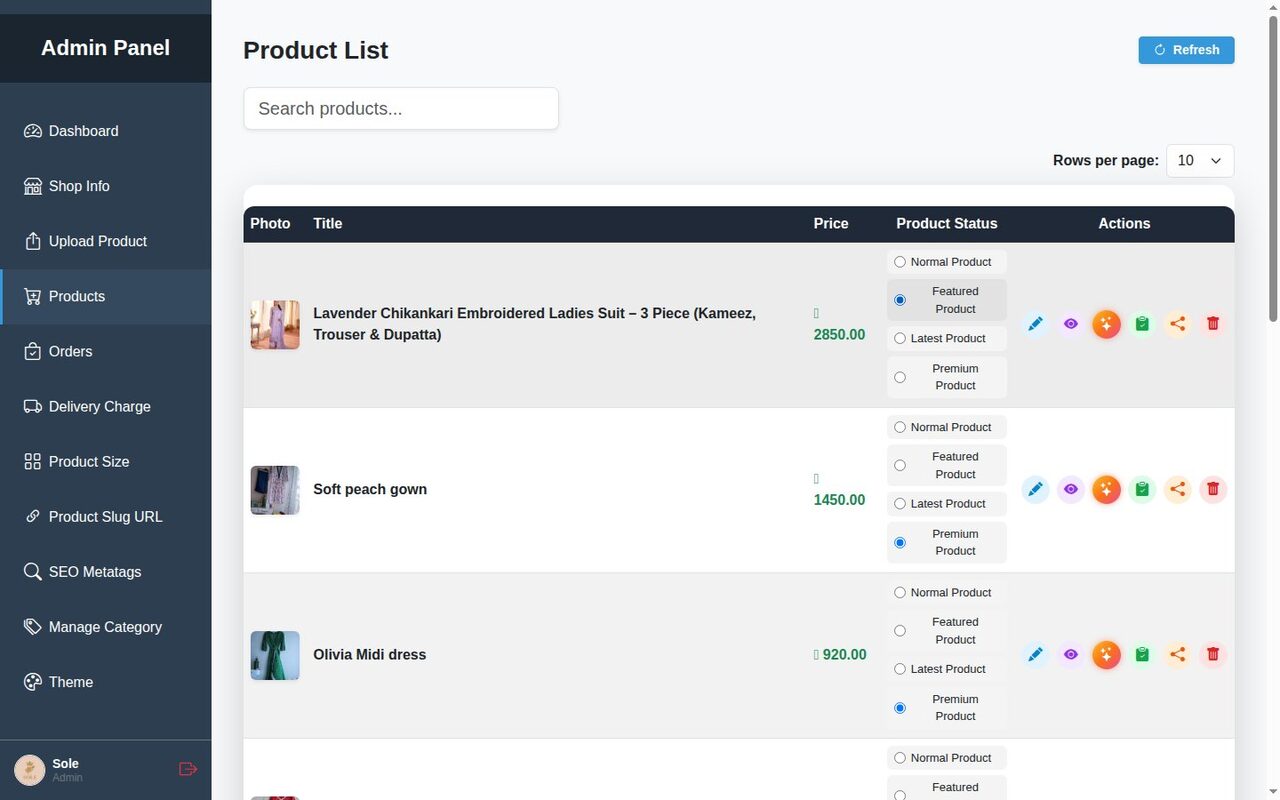
The Products page lists every product with its cover photo, title, price, Product Status radio buttons and action icons: edit, view on storefront, copy link, share and delete. Use the search box and Rows per page selector for large catalogues.
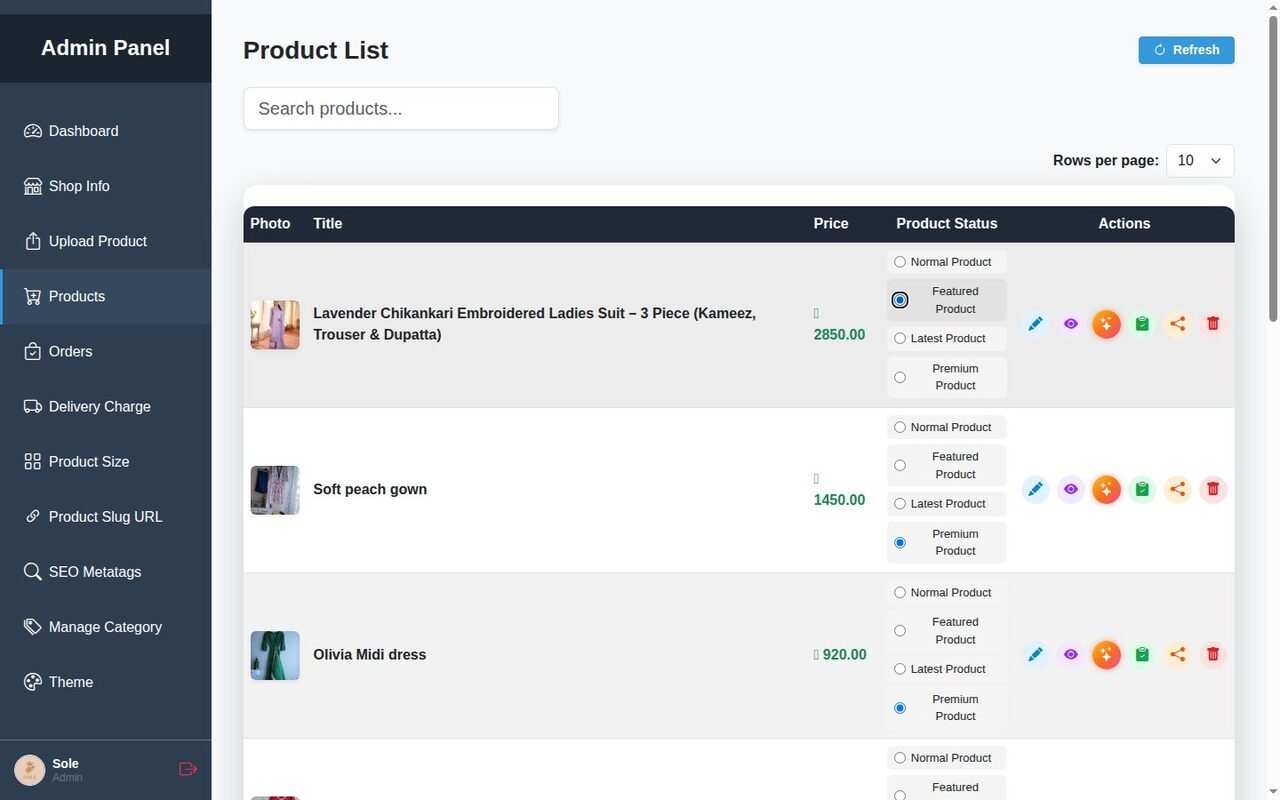
Product status is changed with a single click: Normal, Featured, Latest or Premium. We marked the suit Featured, which places it in the Featured Products block on the storefront home page and on /landingpage.
9. Product Slug URL — /Product/View/{id} vs /{slug-url}
Every product is reachable immediately at its numeric address, for example sole.shopebusiness.com/Product/View/970. That works, but a readable URL ranks better and looks more trustworthy when shared. Go to Product Slug URL, choose the product, type a slug such as lavender-chikankari-ladies-suit and click Save Slug.
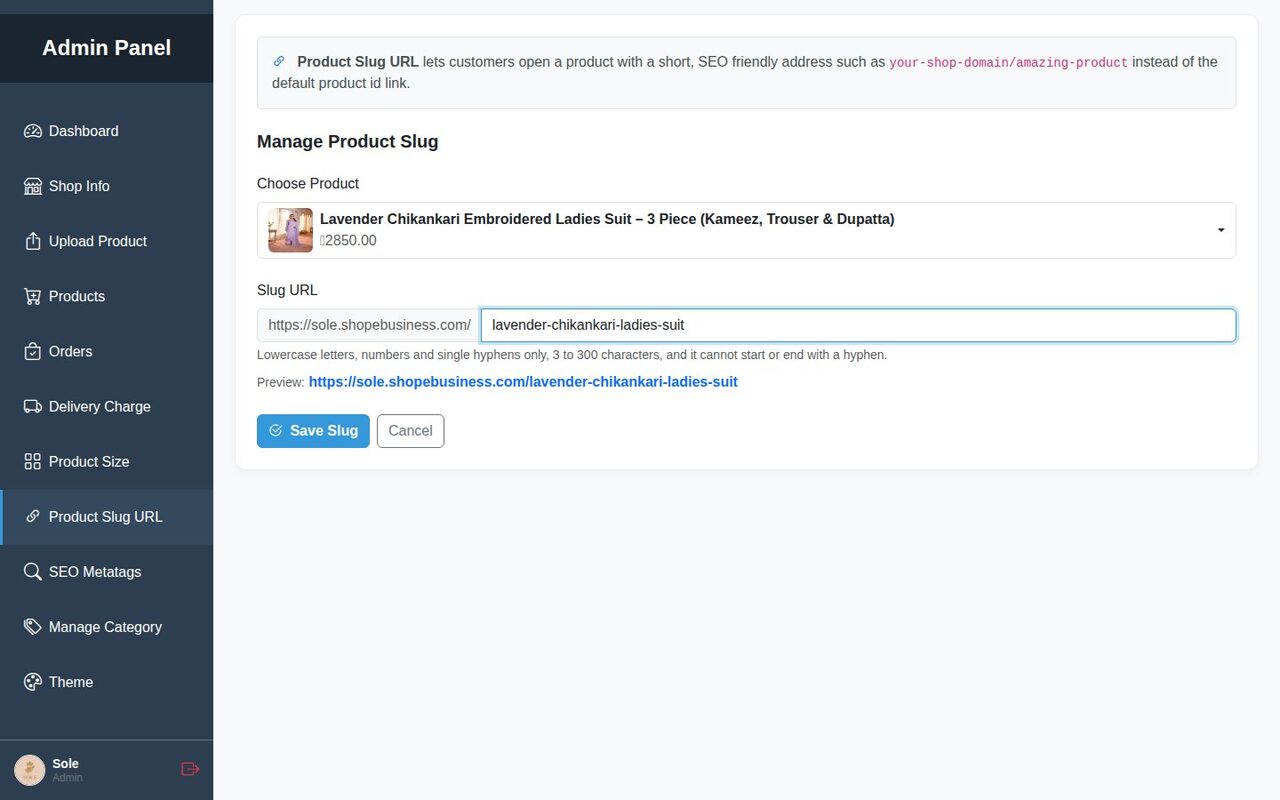
Once saved, the page shows the Current Slug URL. Your product now lives at sole.shopebusiness.com/lavender-chikankari-ladies-suit, and the same slug also powers the one-click buy page sole.shopebusiness.com/buy/lavender-chikankari-ladies-suit (section 14). The old numeric URL keeps working, so nothing breaks.
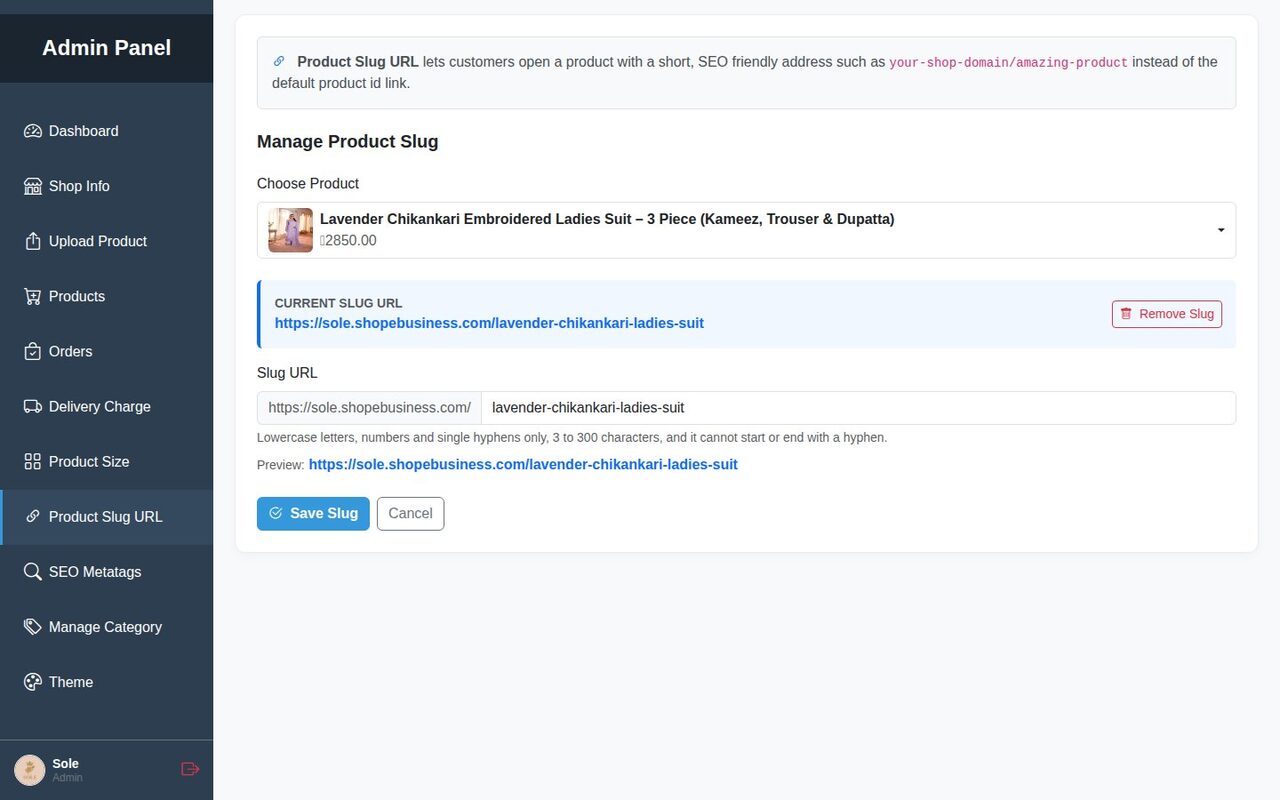
Slug rules: lowercase letters, numbers and single hyphens only; 3–300 characters; no leading or trailing hyphen; must contain at least one letter. Slugs must be unique within your shop and cannot start with a reserved word such as admin, product, order, landingpage or checkout.
10. SEO Metatags
Go to SEO Metatags. Under Choose Page select either your shop home page or an individual product; the Selected Page URL is displayed so you know exactly which page you are optimising. Enter Keywords (comma-separated) and a Description of about 150–160 characters, or press Use Auto Generated to fill them from the product title and short description. Click Save Metatags.
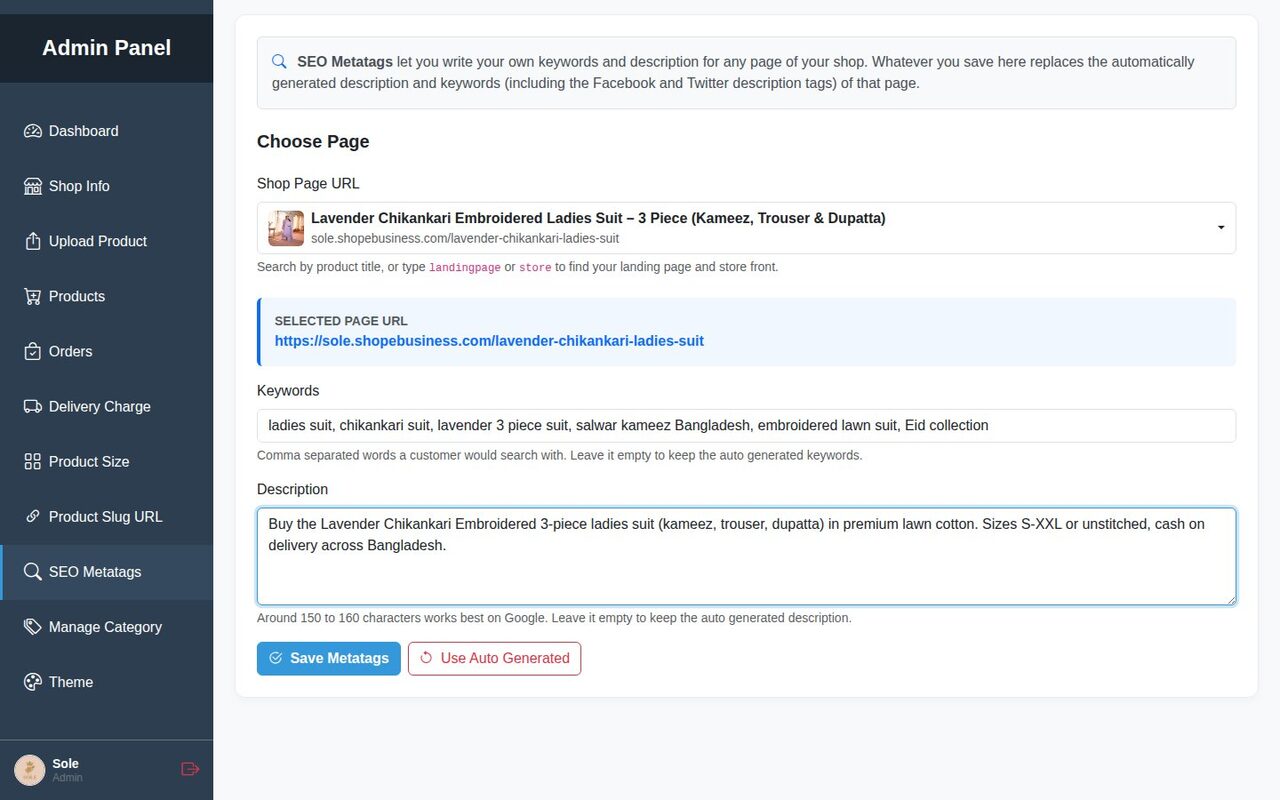
Saved metatags become the <title>, <meta name="description"> and Open Graph tags on that page — the text Google shows in search results and Facebook/WhatsApp show when the link is shared.
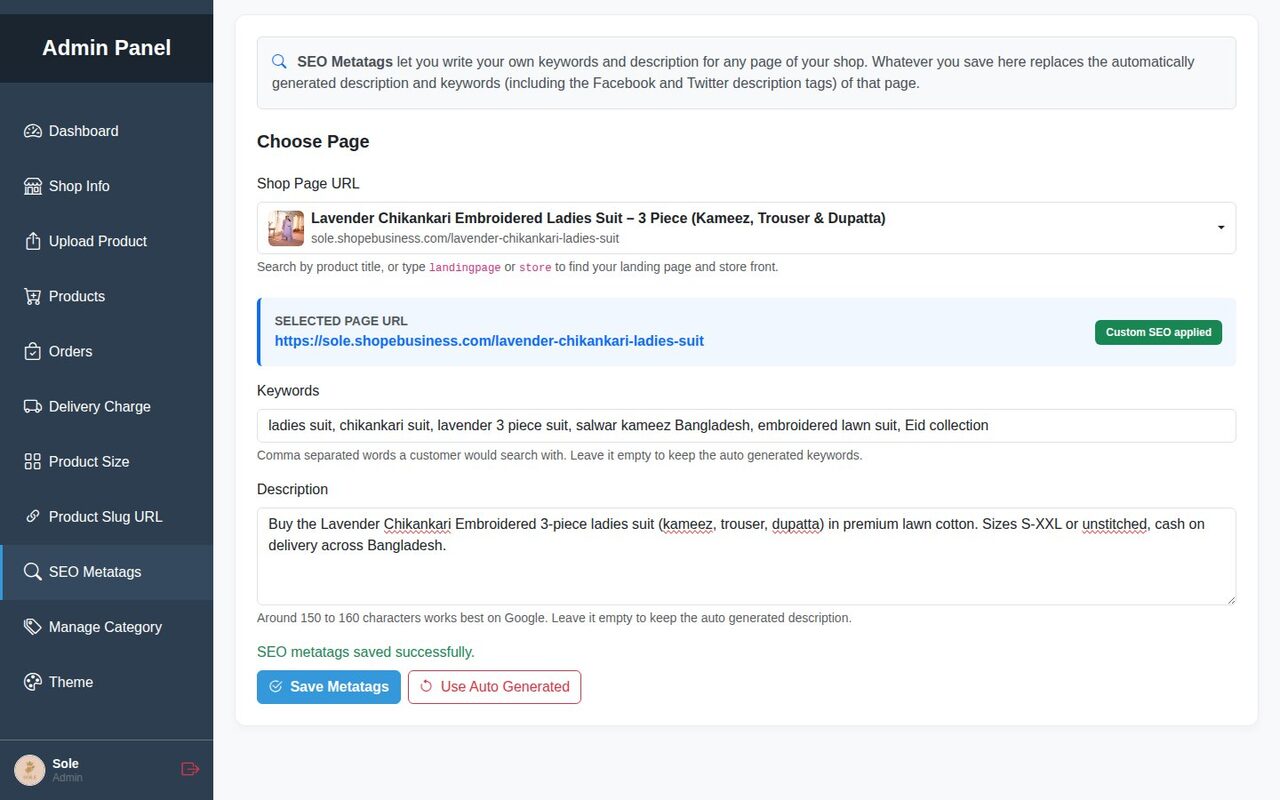
SEO tip: Combine sections 6, 9 and 10: a long description, a readable slug and a keyword-rich meta description is the fastest way to get a product page indexed and clicked.
11. Delivery Charge
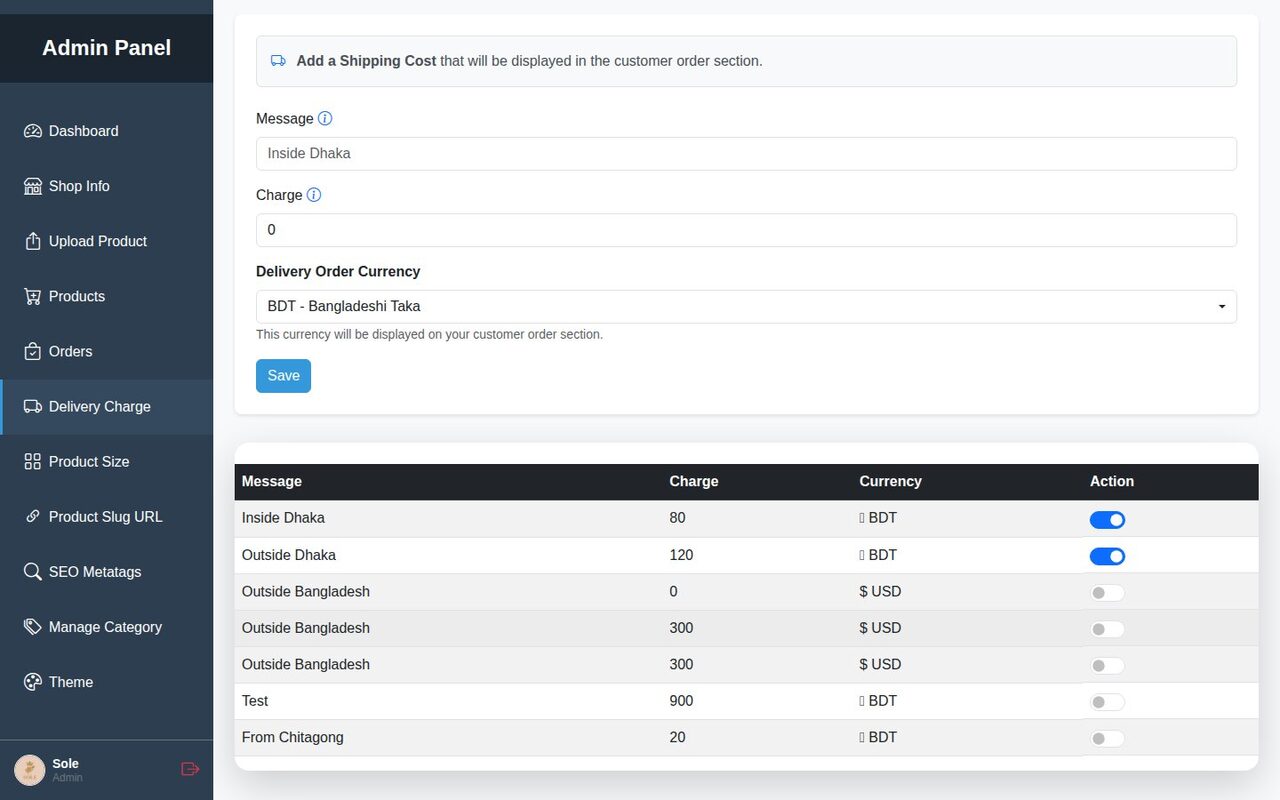
Go to Delivery Charge. Each row is a shipping option the customer can pick at checkout: a Message (e.g. Inside Dhaka, Outside Dhaka, Outside Bangladesh), the Charge and its Delivery Order Currency. Click Save and repeat for each zone. Use the toggle in the Action column to hide an option temporarily without deleting it.
12. Orders and Order Status
Every checkout appears instantly in Orders, with the product, size, quantity, customer name, phone, address, note and a price summary (items + shipping = total). Customer details are blurred in our screenshots for privacy.
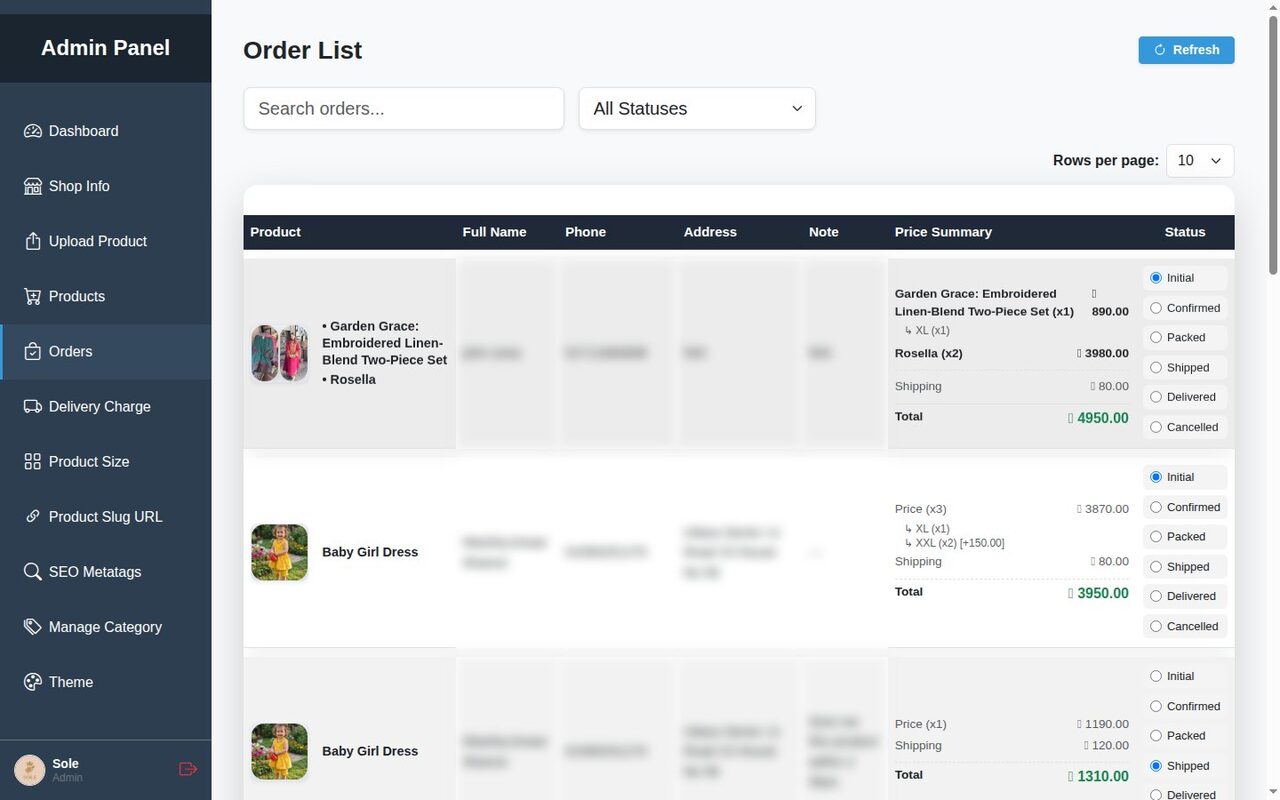
Change the status with the radio buttons on the right — Initial → Confirmed → Packed → Shipped → Delivered, or Cancelled. The change is saved immediately. Use the All Statuses filter and the search box to find, for example, every order still waiting to be packed.
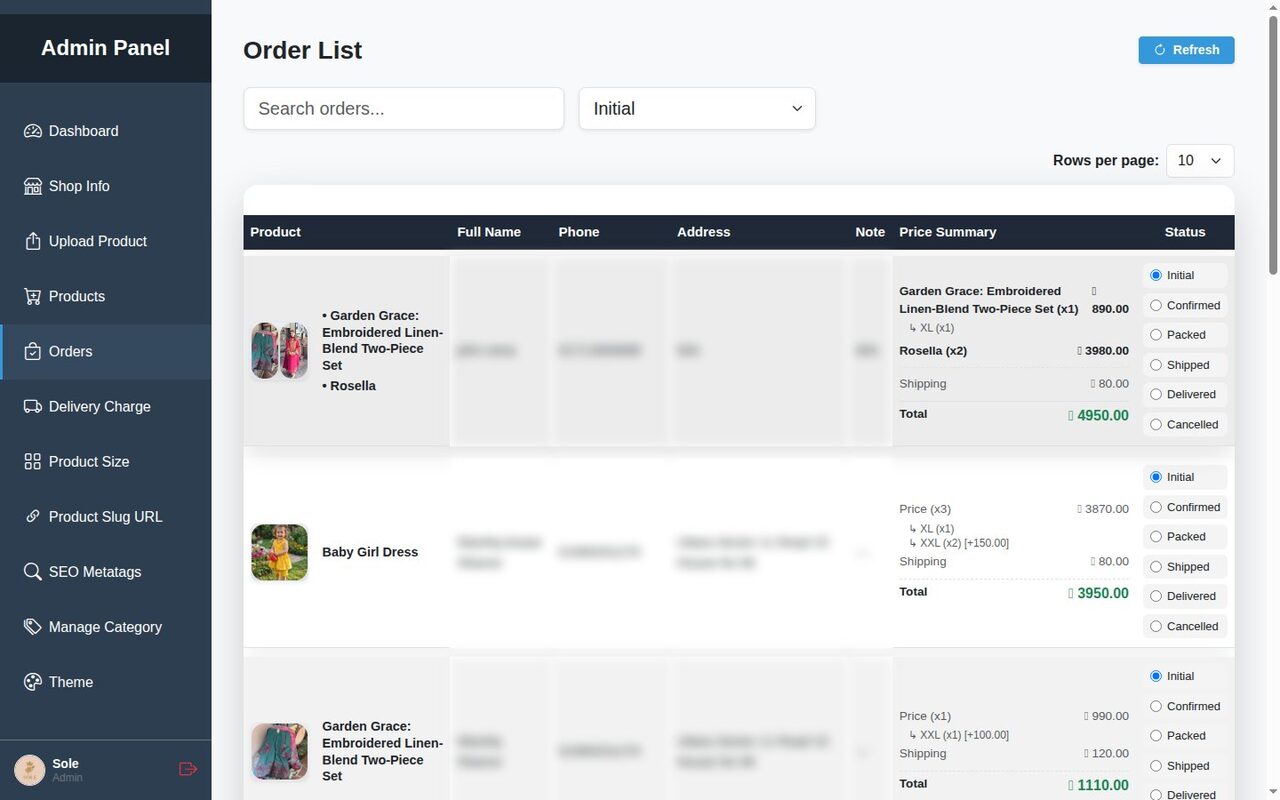
Tip: Orders are cash-on-delivery style — no card gateway is needed. Confirm the order by phone or Messenger, then move it through the statuses as you pack and ship.
13. The Customer Storefront: Home, /landingpage, Product Page, Cart and Checkout
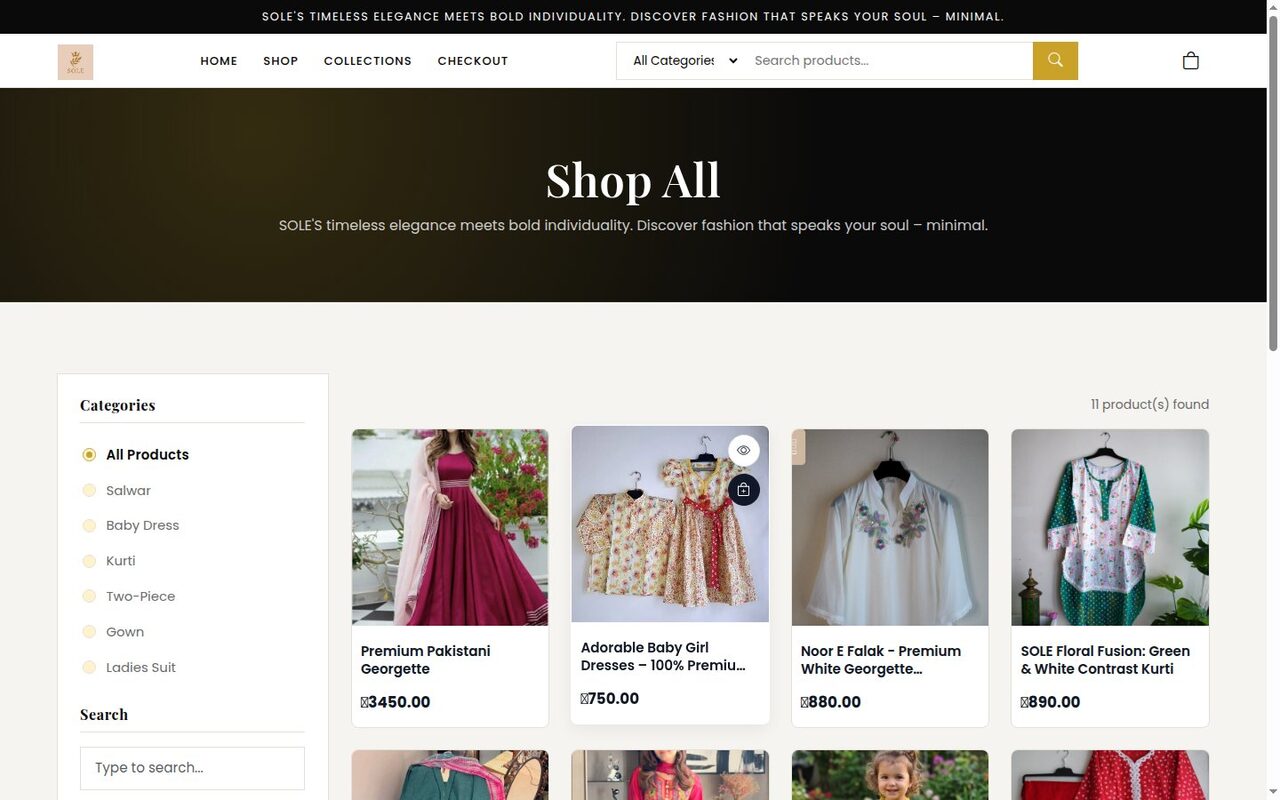
Your customers never see the admin panel. They visit yourstore.shopebusiness.com and get a fast, mobile-first shop. Below is the storefront in the currently applied theme (Fashion Luxe); section 15 shows the same pages in Classic and Grocery Inspired.
Storefront home — /
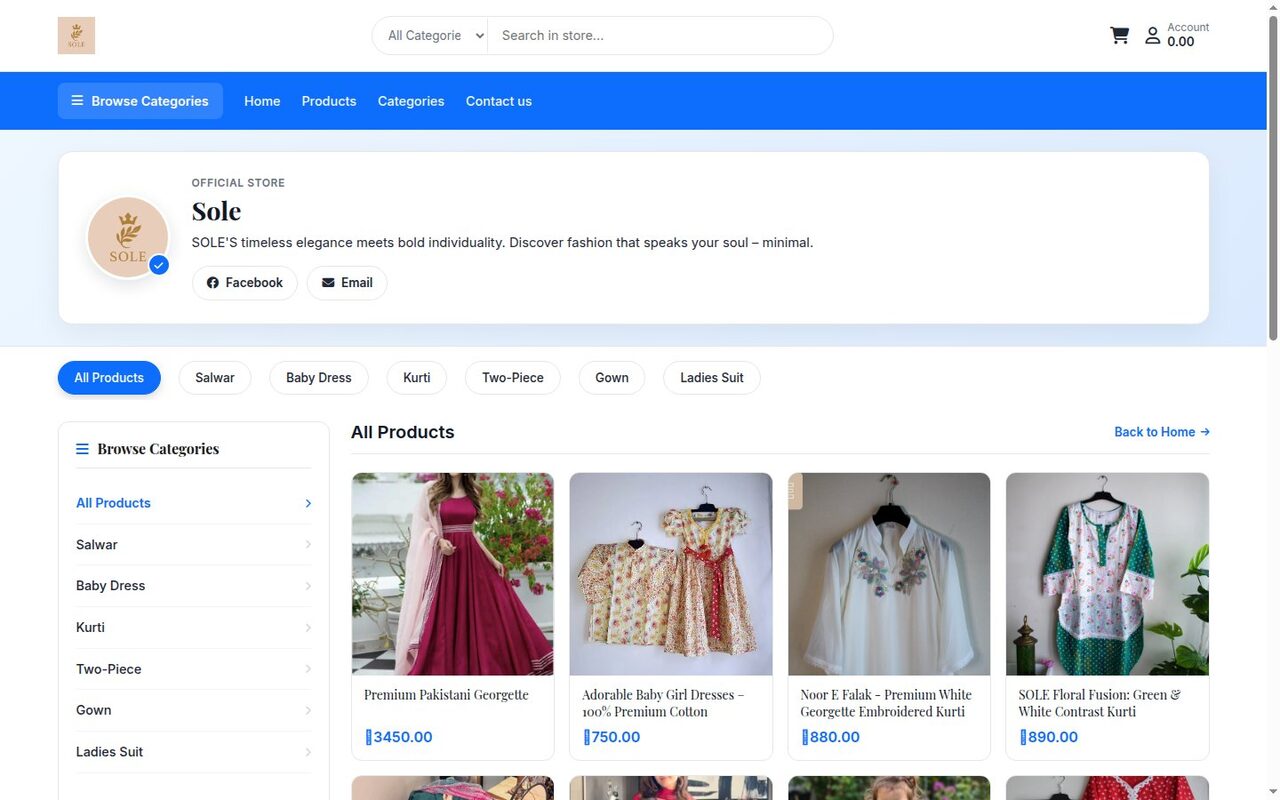
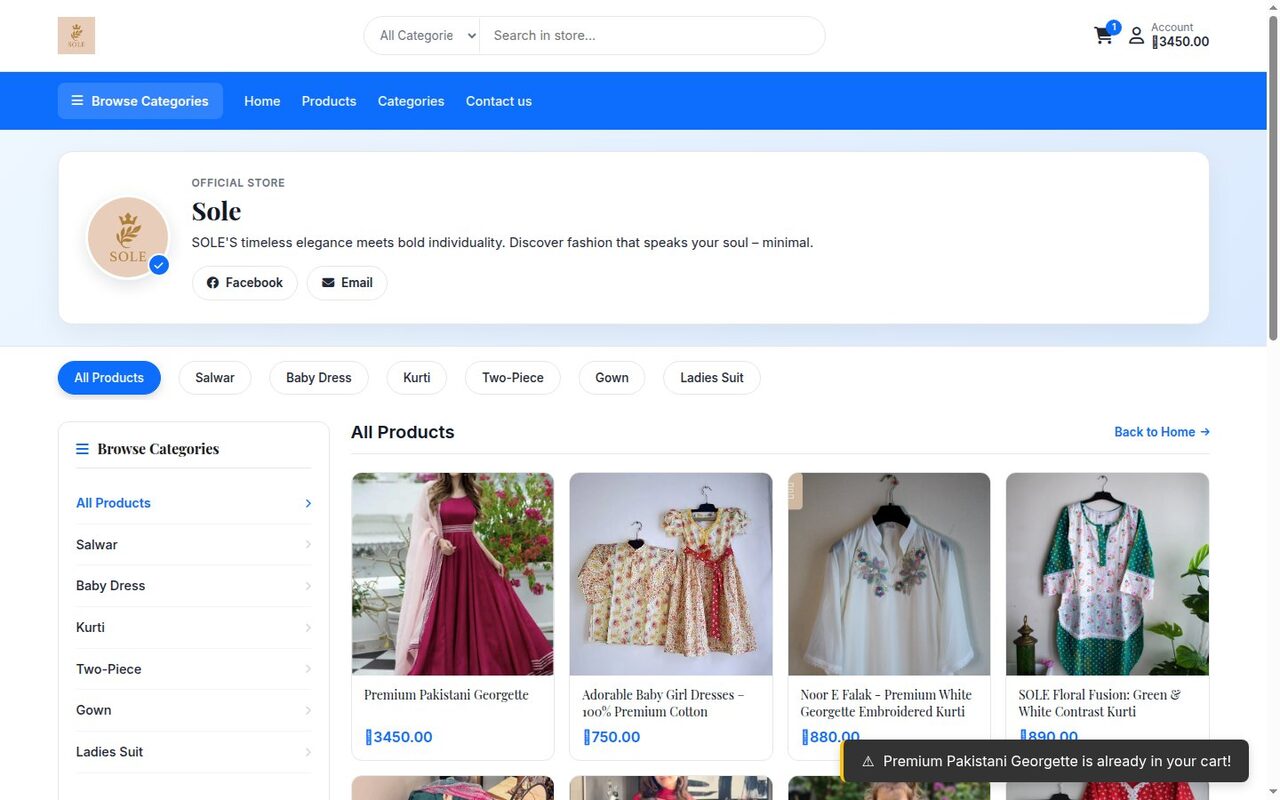
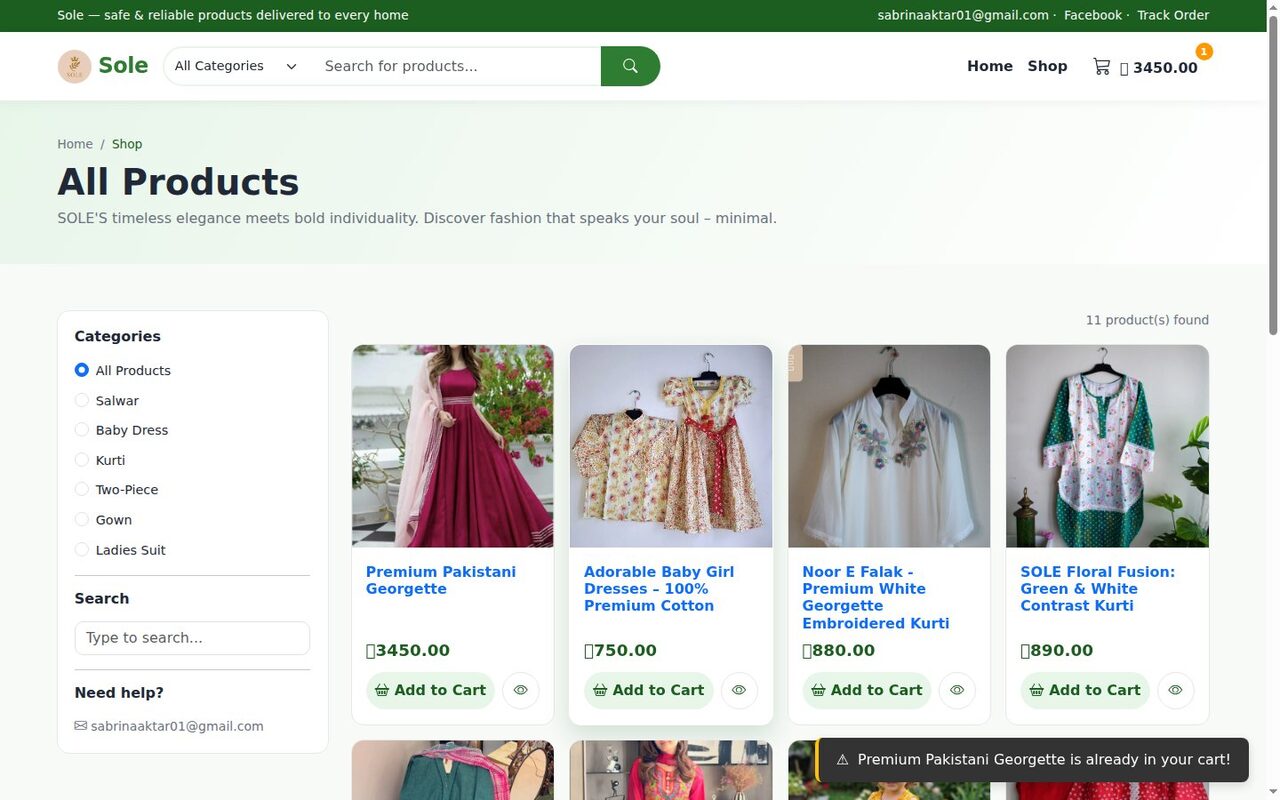
The home page is the full catalogue: a category sidebar, search, and a product grid where every card shows the cover photo, title, price and a quick add to cart button.
Landing page — /landingpage
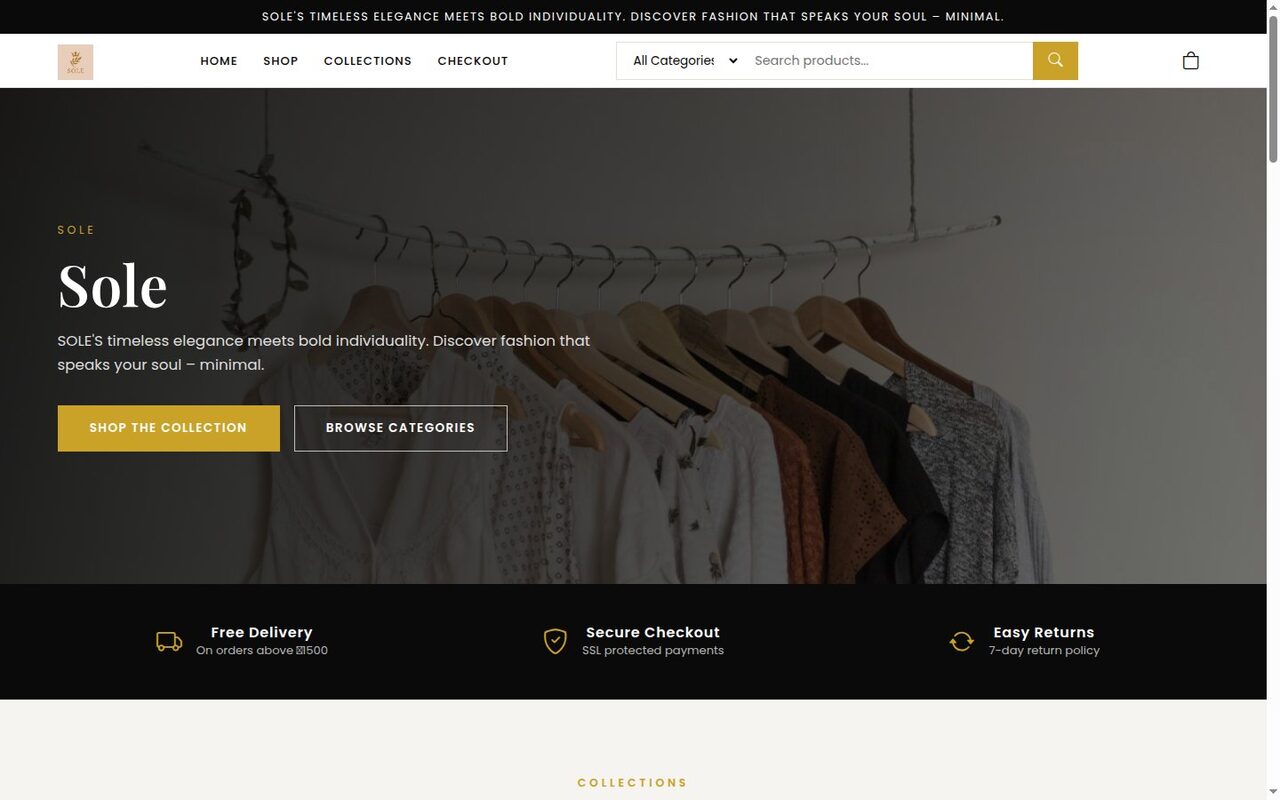
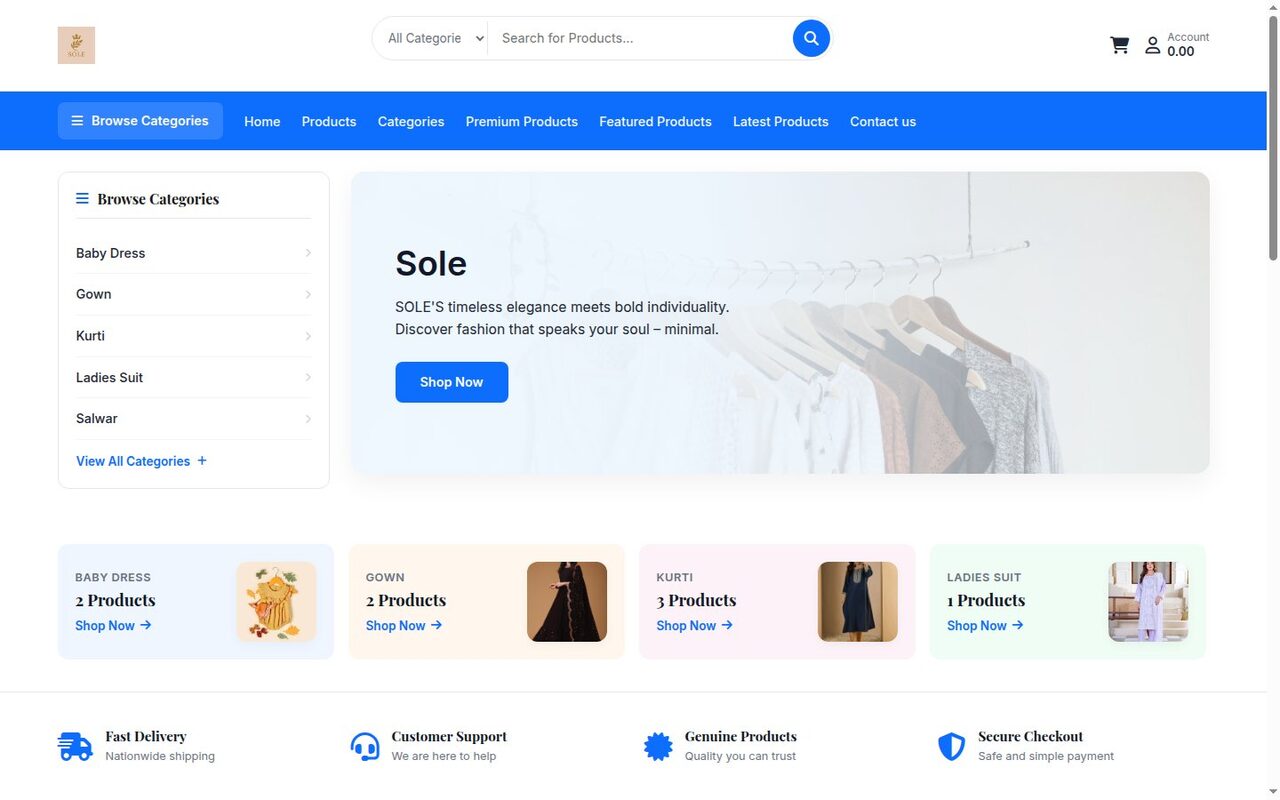
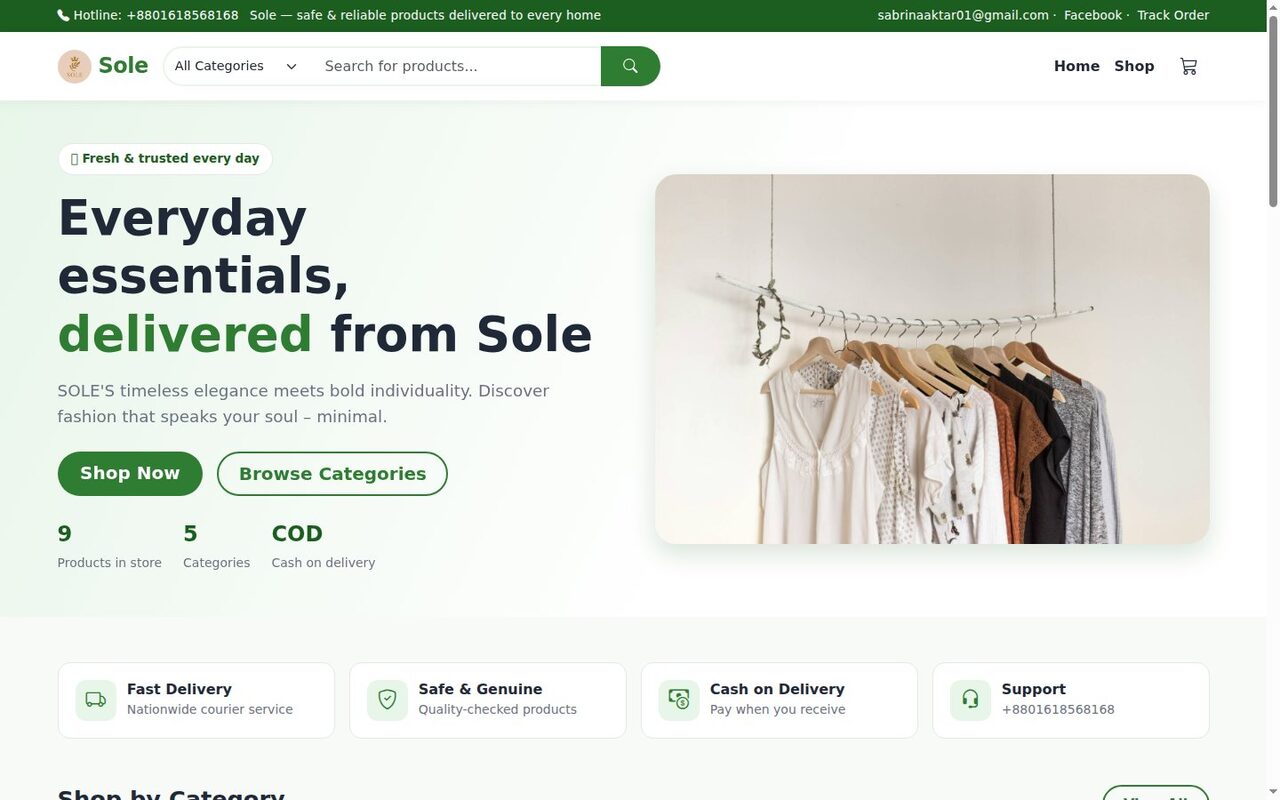
Every shop also has a marketing landing page at yourstore.shopebusiness.com/landingpage. It uses your Cover Photo as the hero, shows your shop description, Shop the Collection and Browse Categories buttons, trust badges (free delivery, secure checkout, easy returns), your category tiles and the Featured and Latest products. This is the link to put in your Facebook bio, Instagram and ads — it is designed to convert visitors, while / is designed for browsing.
Product page — /{slug-url} or /Product/View/{id}
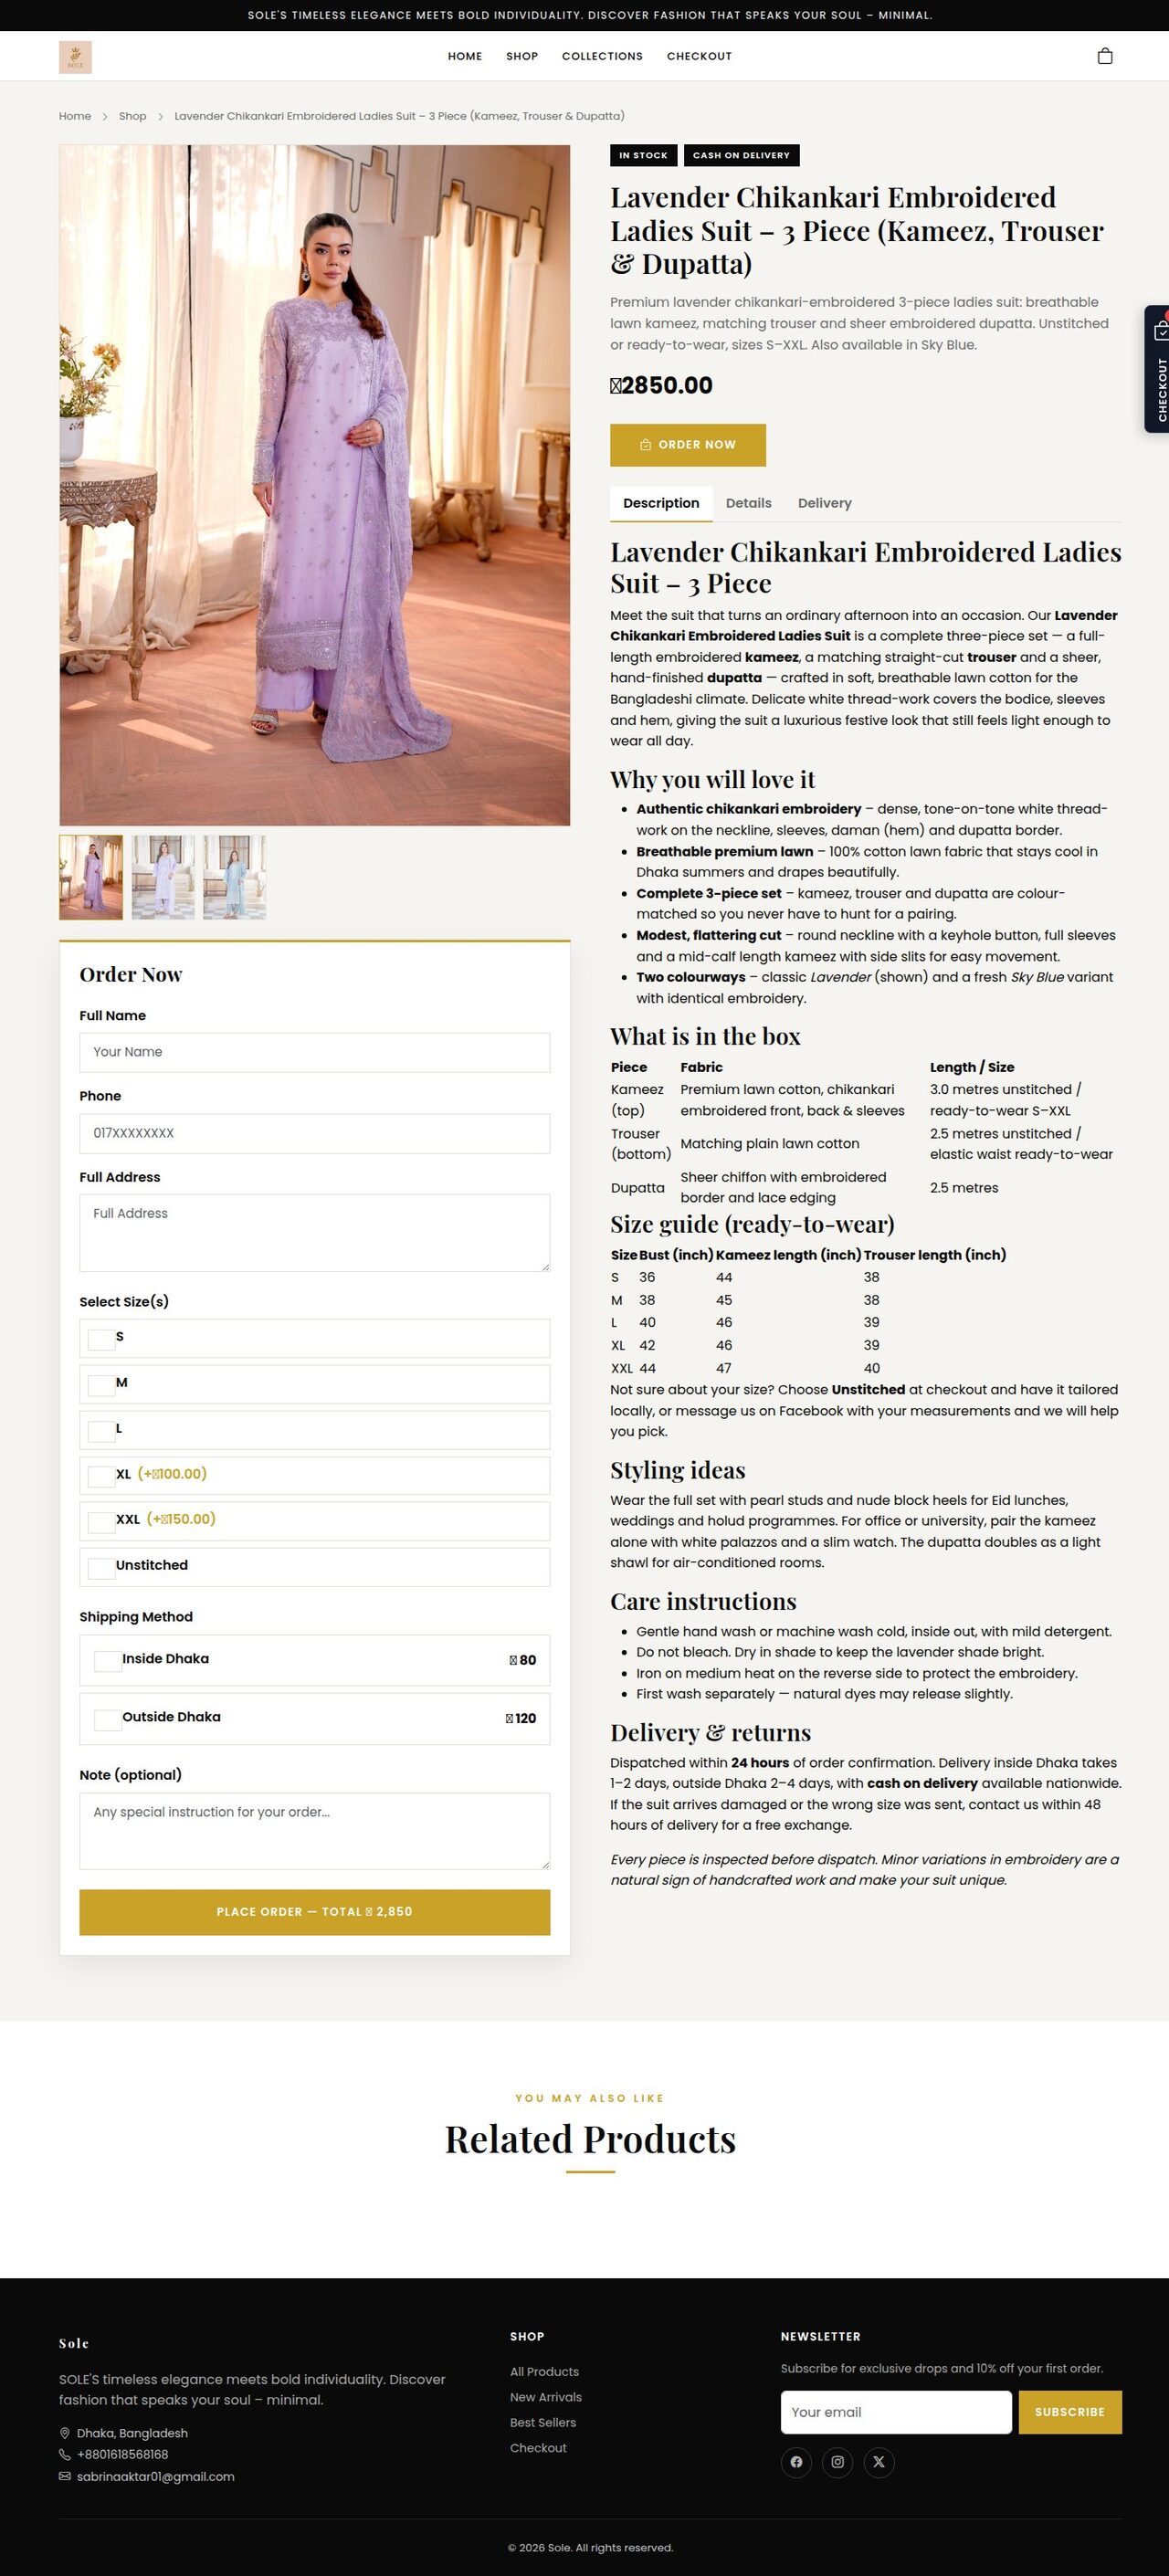
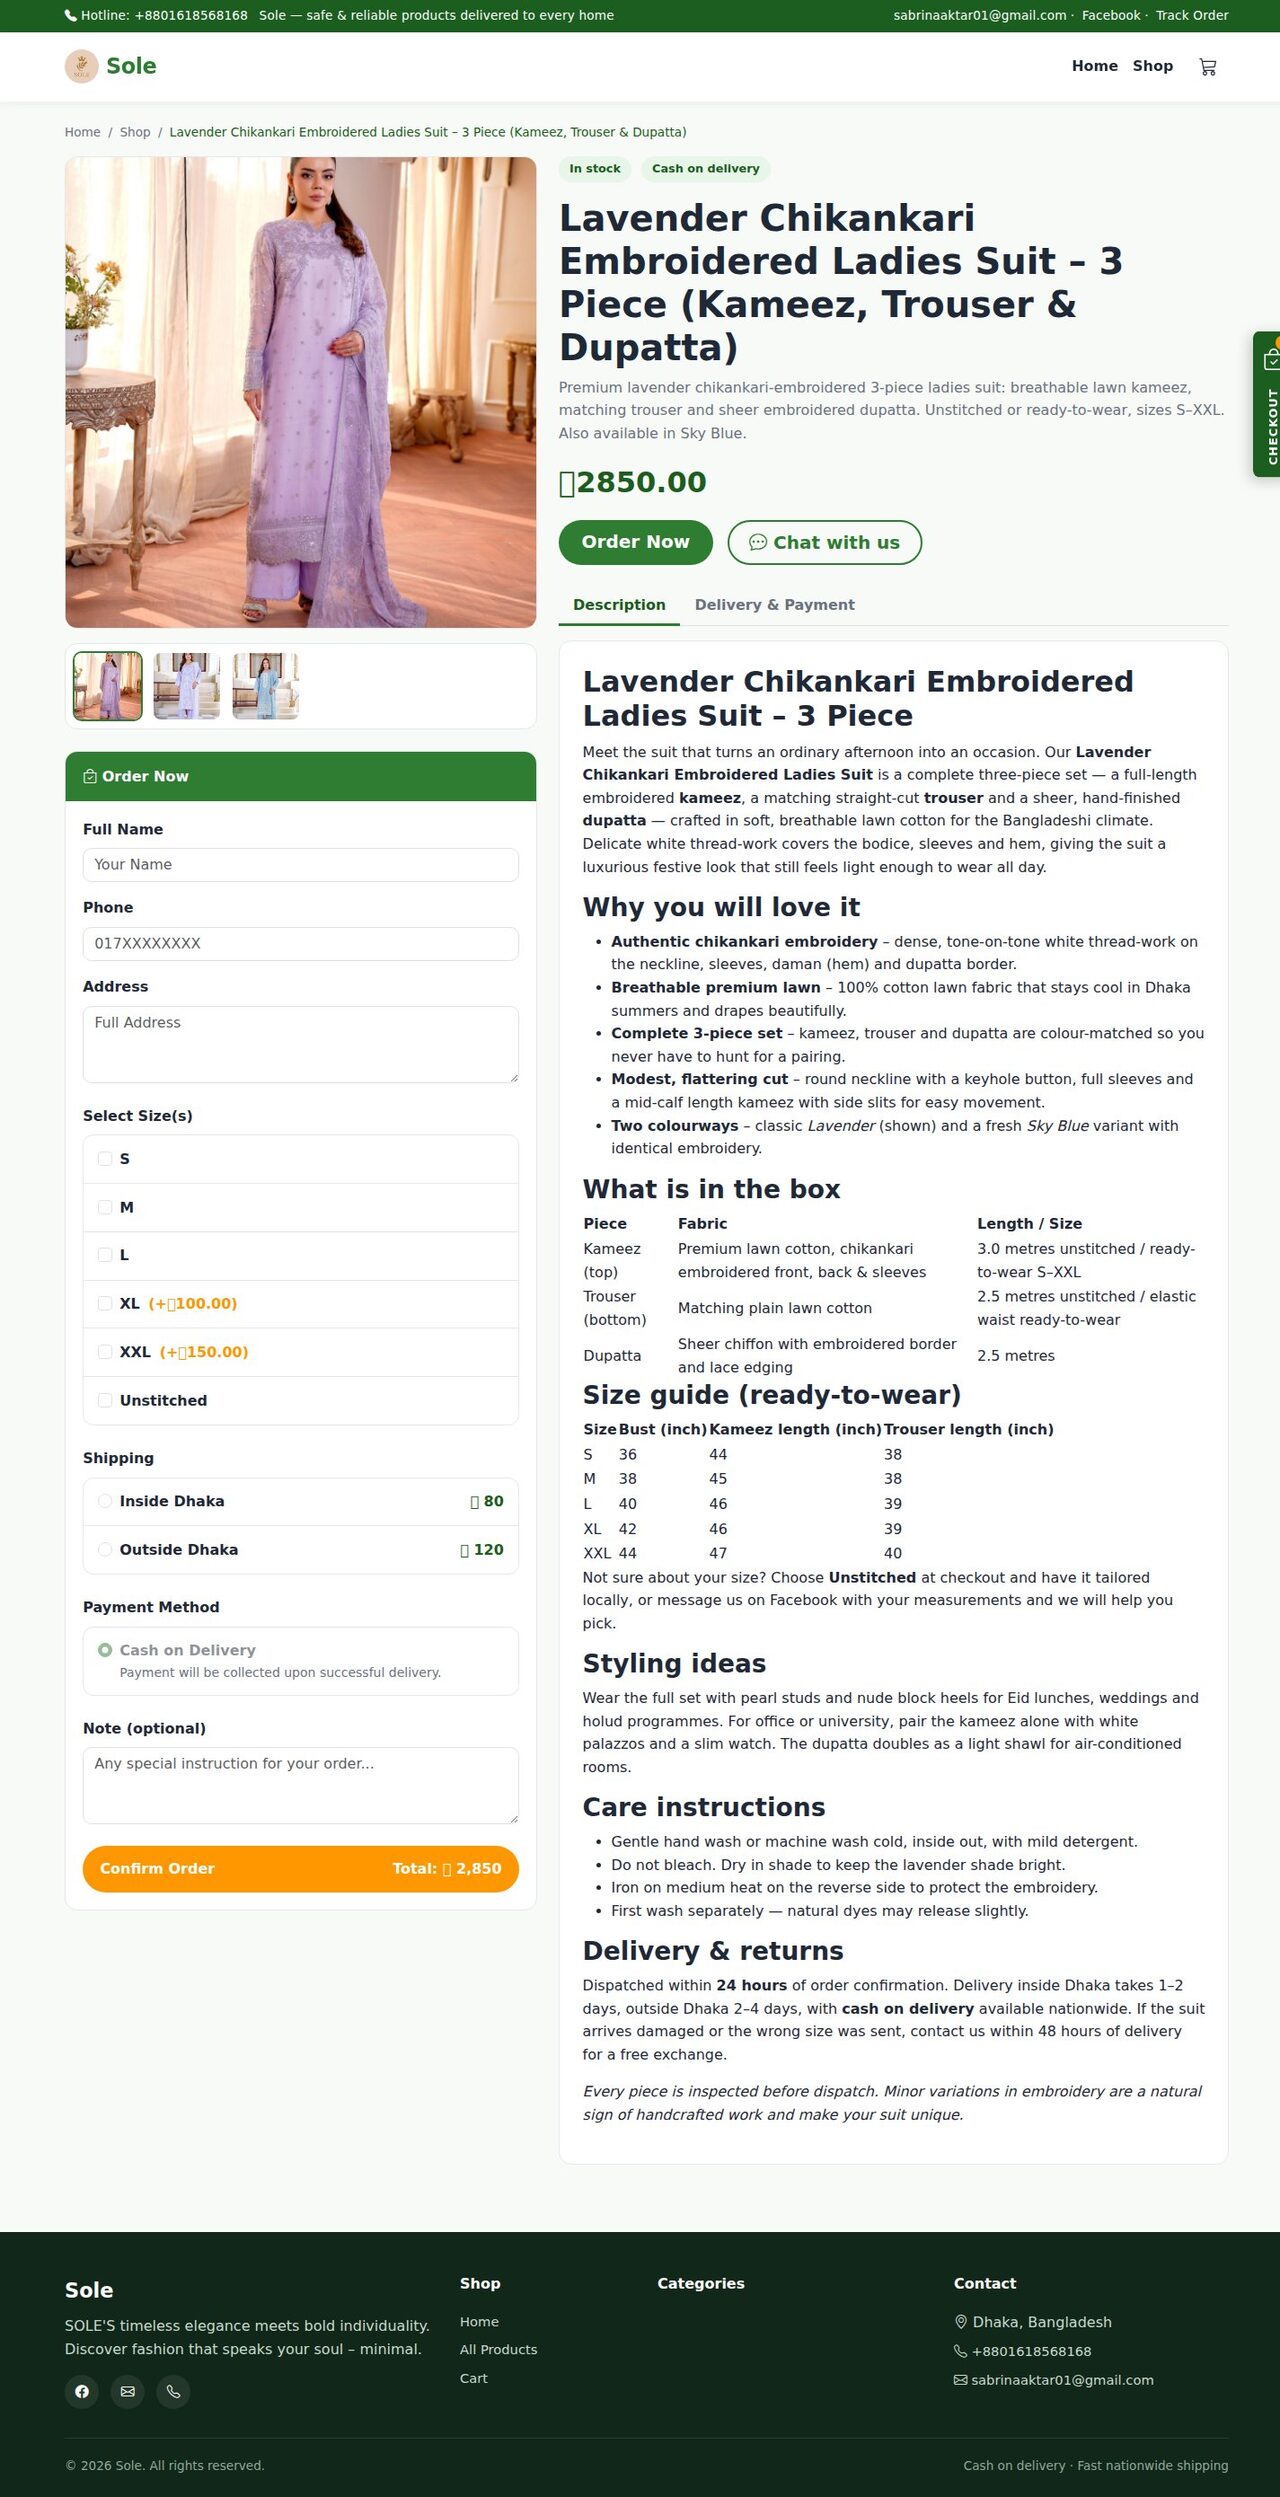
The product page shows the photo gallery, price, size dropdown, Order Now and Add to Cart buttons, and — most importantly — your full long description in the Description tab, followed by Details and Delivery. This is why section 6 asked you to write a big description: the page below is filled entirely with the text we entered in the editor.
Add to cart
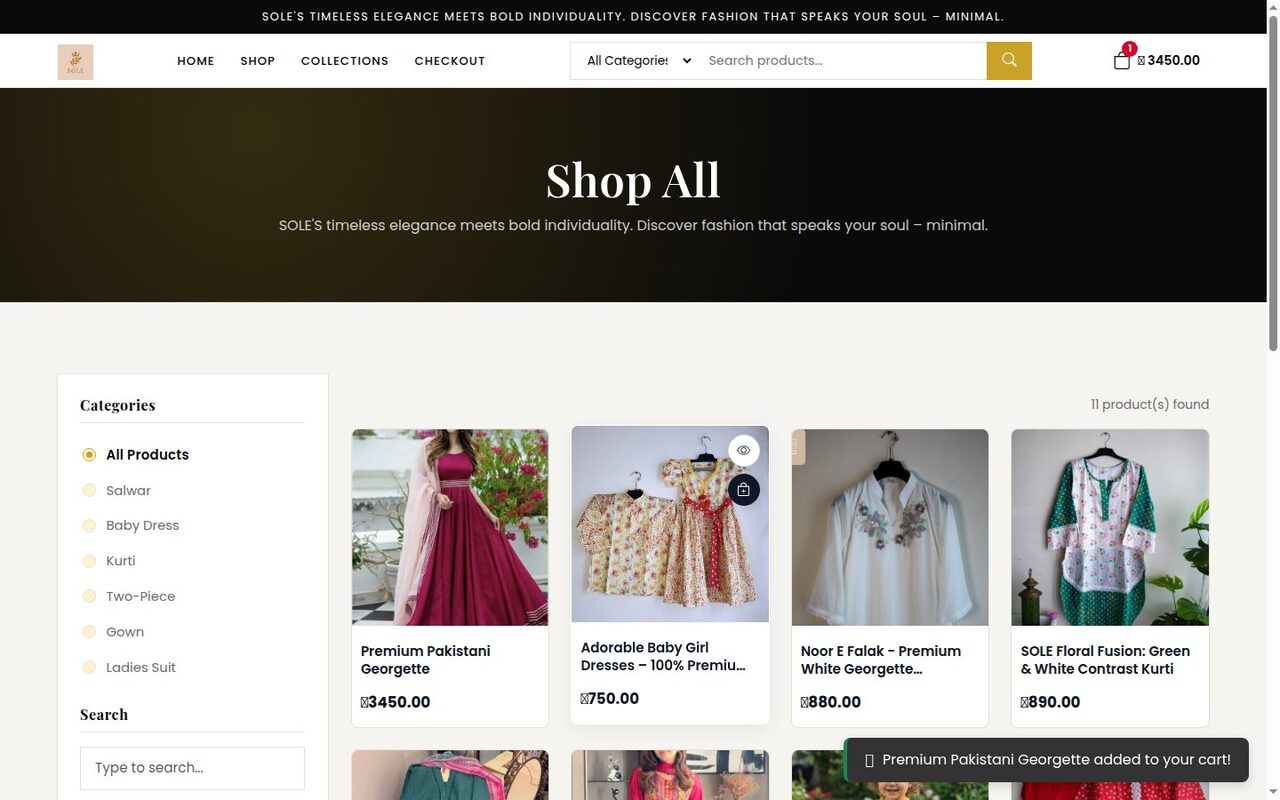
Clicking the cart icon on a card (or Add to Cart on the product page) adds the item and shows a confirmation toast; the header cart counter updates instantly.
Checkout — /Order/Checkout
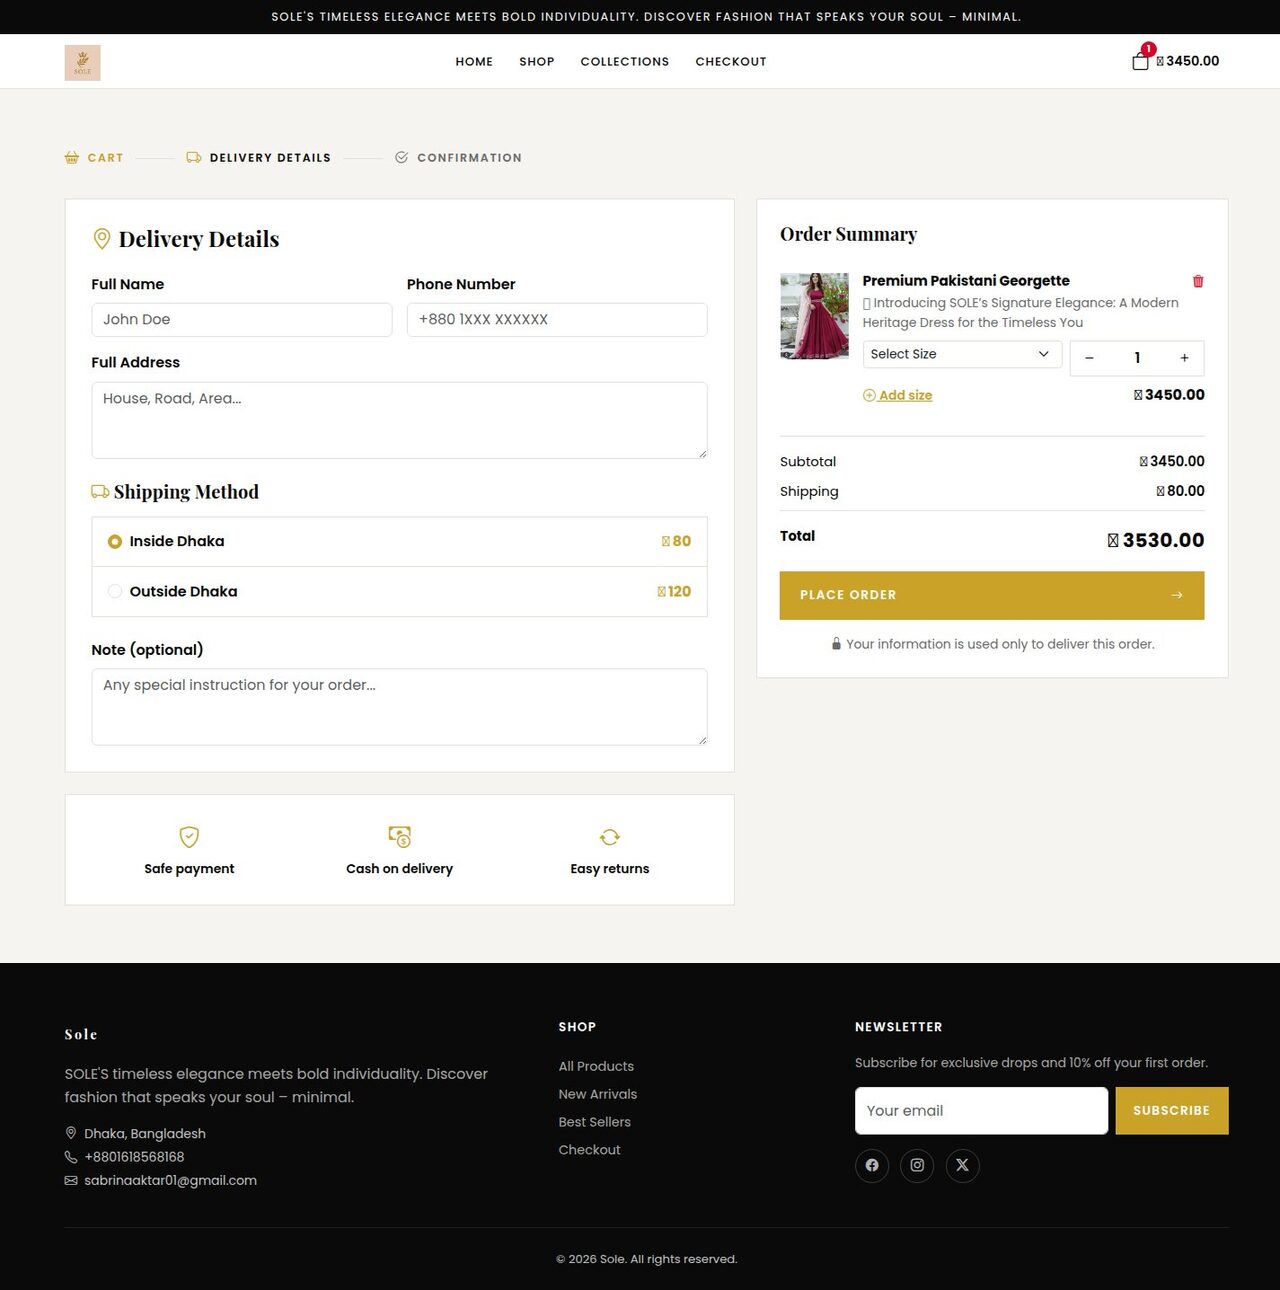
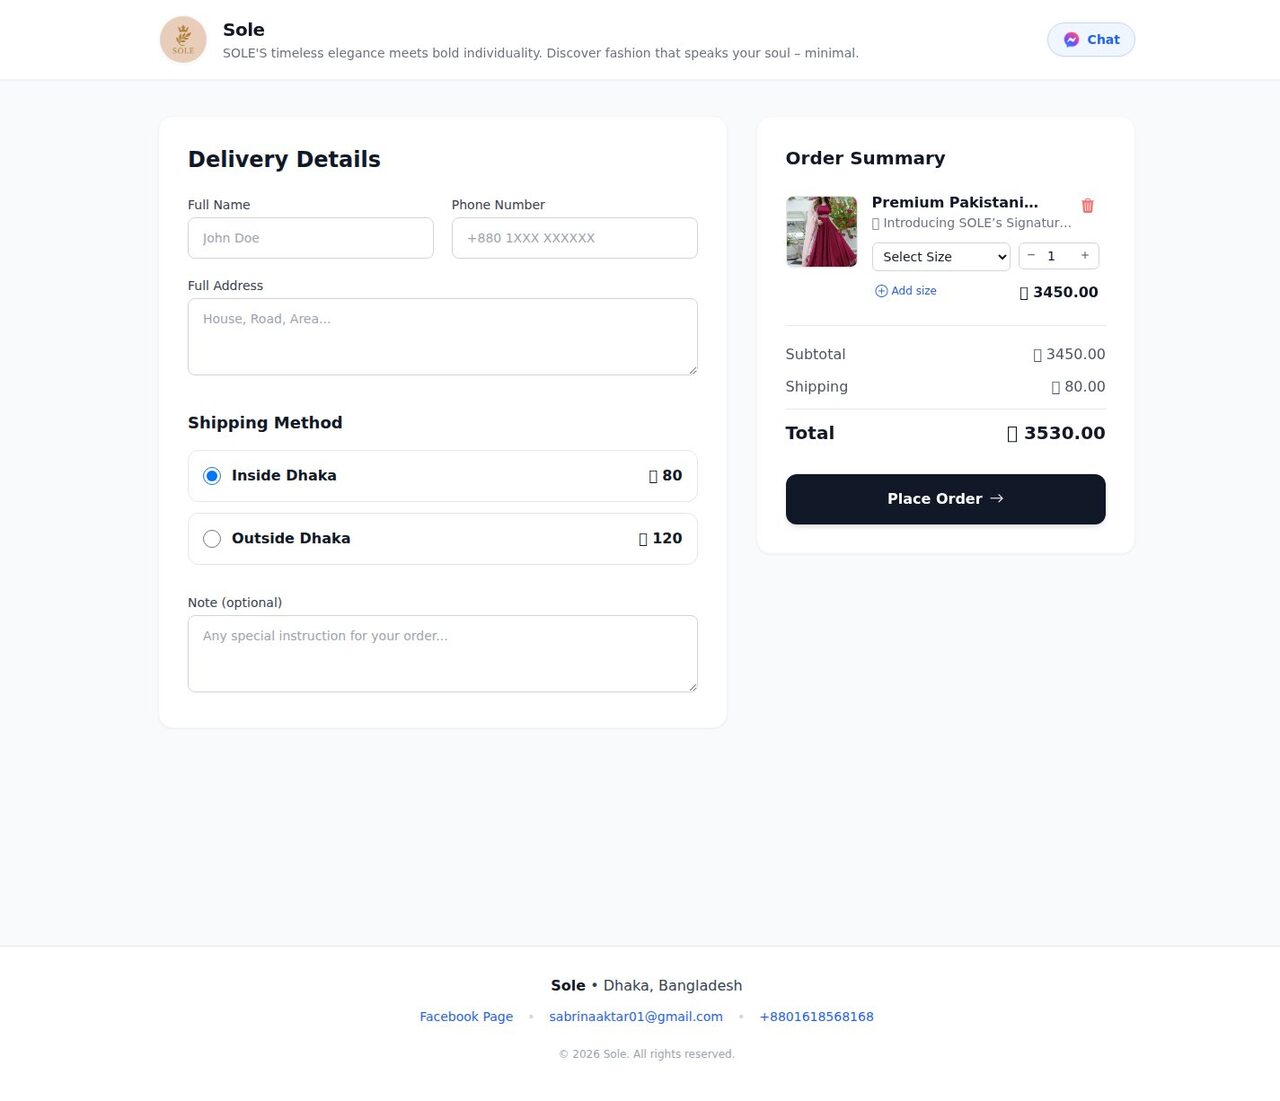
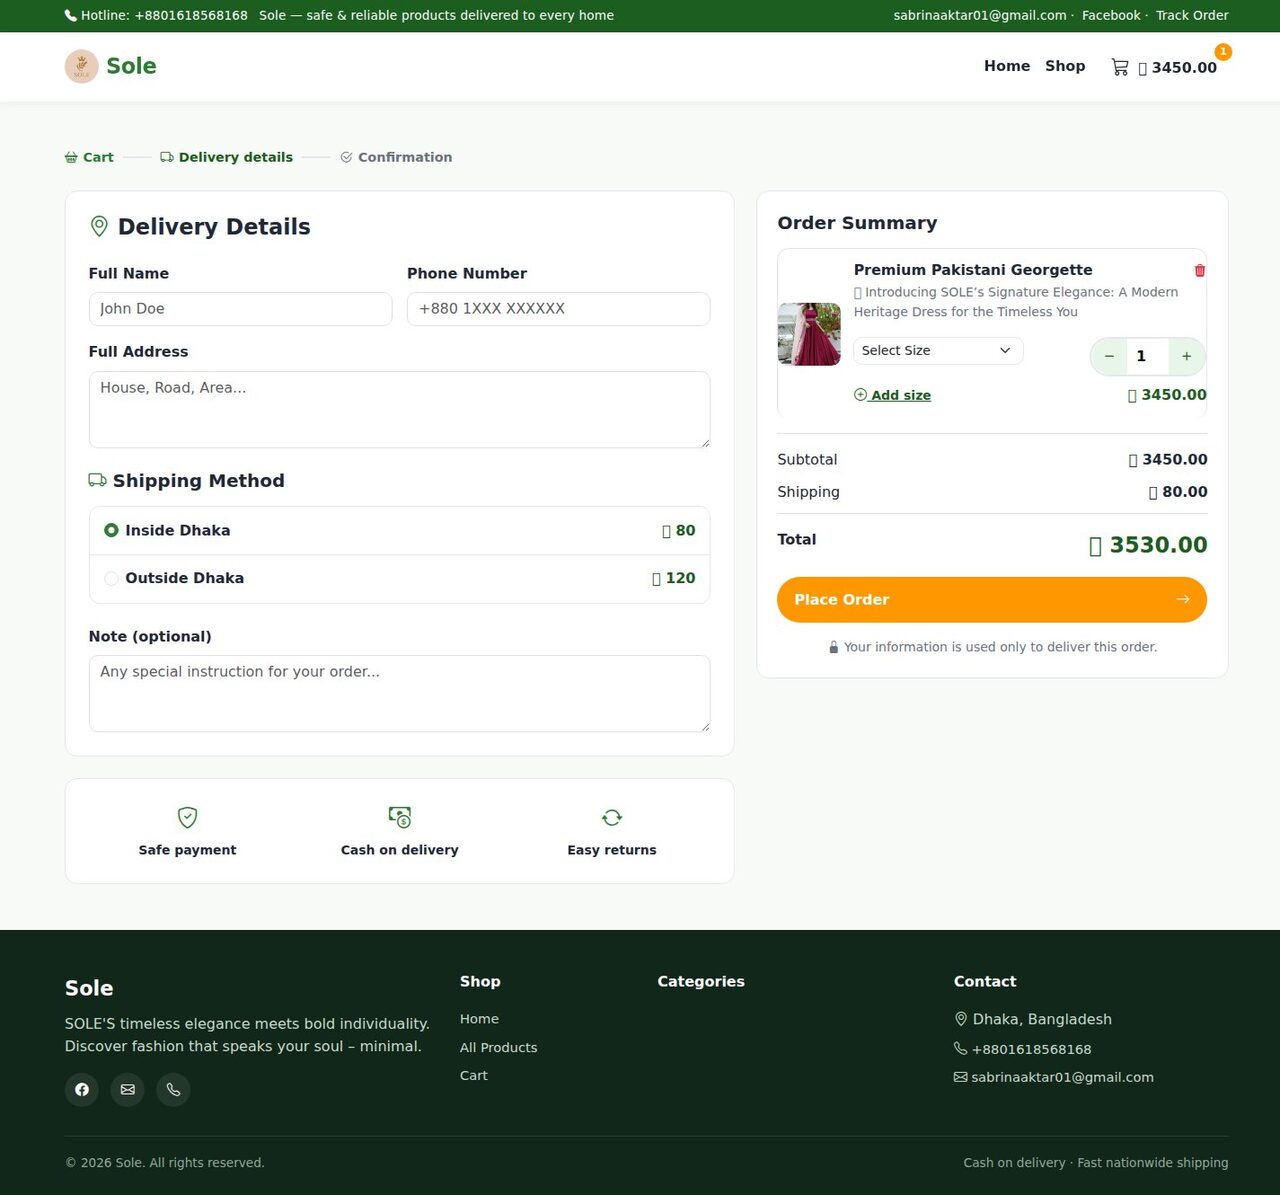
The checkout page asks for Full Name, Phone Number, Full Address, a Shipping Method (your delivery charges from section 11) and an optional Note. The customer picks a size and quantity per item, sees the live subtotal, shipping and total in the Order Summary and clicks Place Order. The order appears in your Orders page immediately.
14. The /buy Page — One-Click Ordering
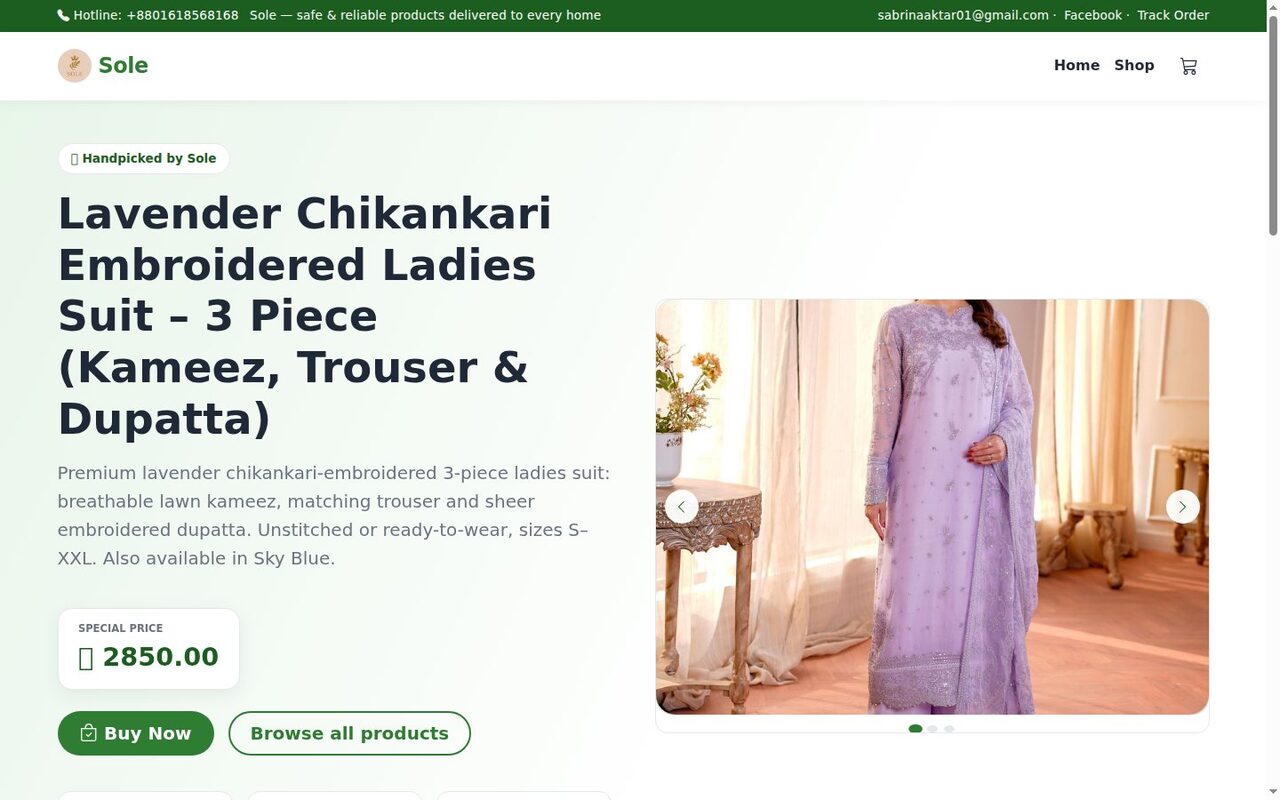
Every product also has a dedicated single-product order page at yourstore.shopebusiness.com/buy/{slug-url} (or /buy/{id}). Unlike the product page, the /buy page has no catalogue navigation: just the gallery, title, short description, the long description, size selector and an Order Now / Buy Now form on the same screen. It is built for ads and Messenger selling — send a customer sole.shopebusiness.com/buy/lavender-chikankari-ladies-suit and they can order in under a minute without being distracted by other products.
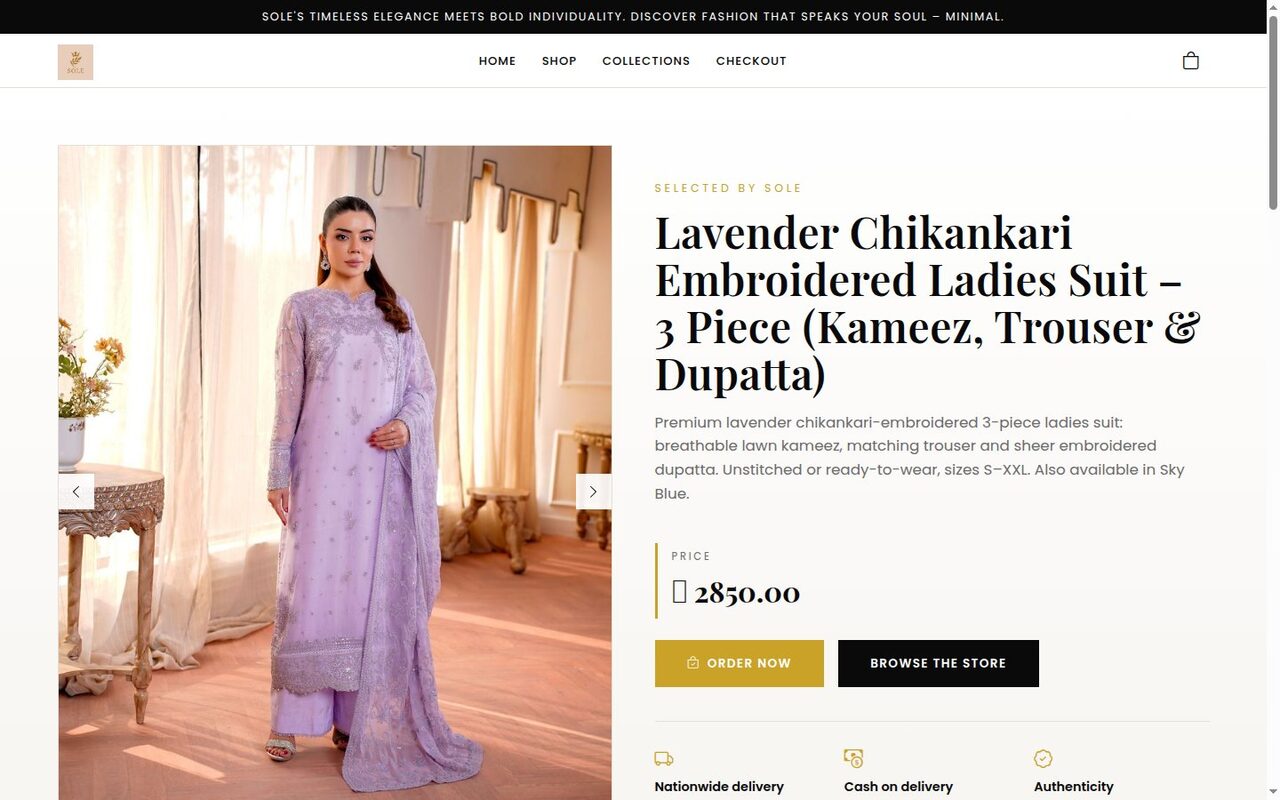
Which link to share? /landingpage for your brand (bio, ads for the whole shop) · /{slug-url} for organic search and product research · /buy/{slug-url} for a single-product ad or a customer who has already decided.
15. Themes: Classic, Grocery Inspired and Fashion Luxe
Go to Theme. Three storefront designs are available, each with a Preview and an Apply button; the active theme is marked Active.
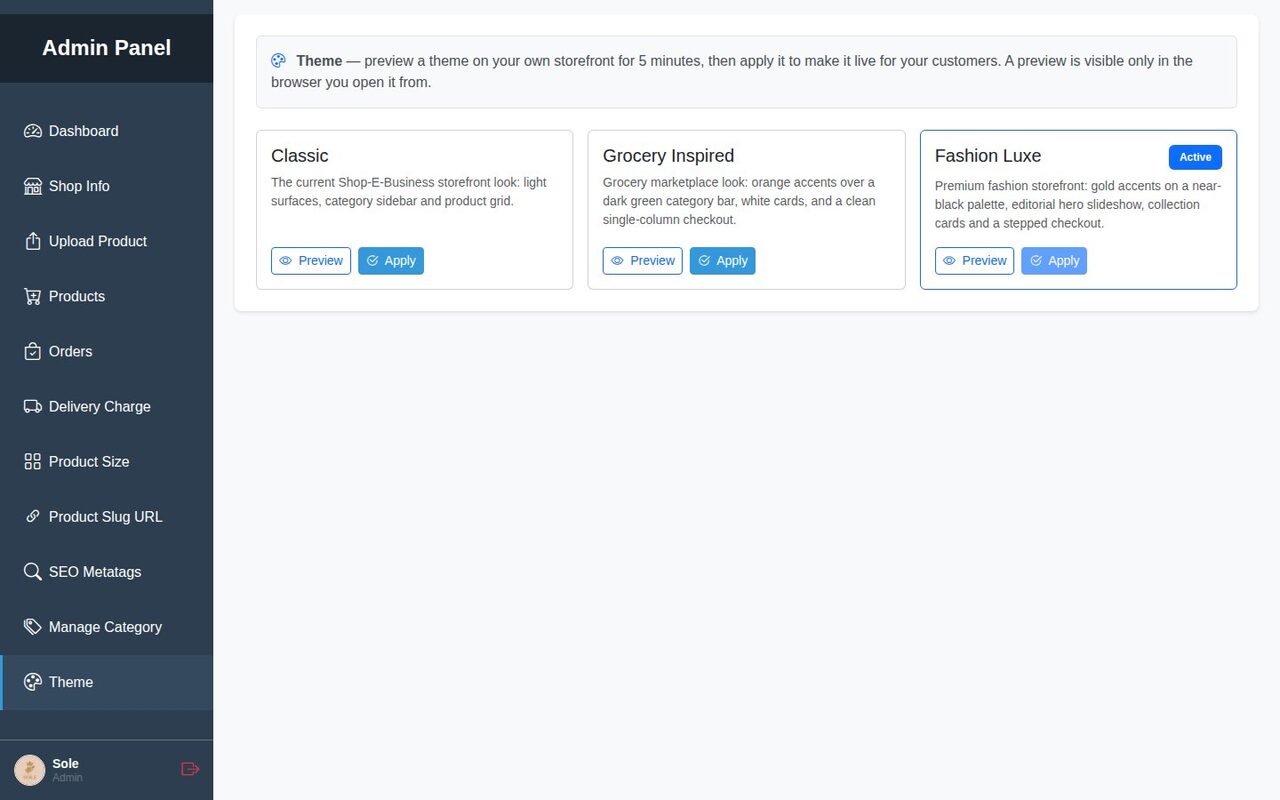
Preview opens your storefront with the chosen theme for 5 minutes — only in your own browser, customers keep seeing the live theme. Apply makes it live for everyone instantly. Every theme renders the same four pages — home, /landingpage, product page and /buy — so your content never changes, only the design.
Classic
The default look: light surfaces, a blue category bar, category sidebar and product grid. Best for general stores and electronics.
Classic — home /
Classic — /landingpage
Classic — product page /lavender-chikankari-ladies-suit
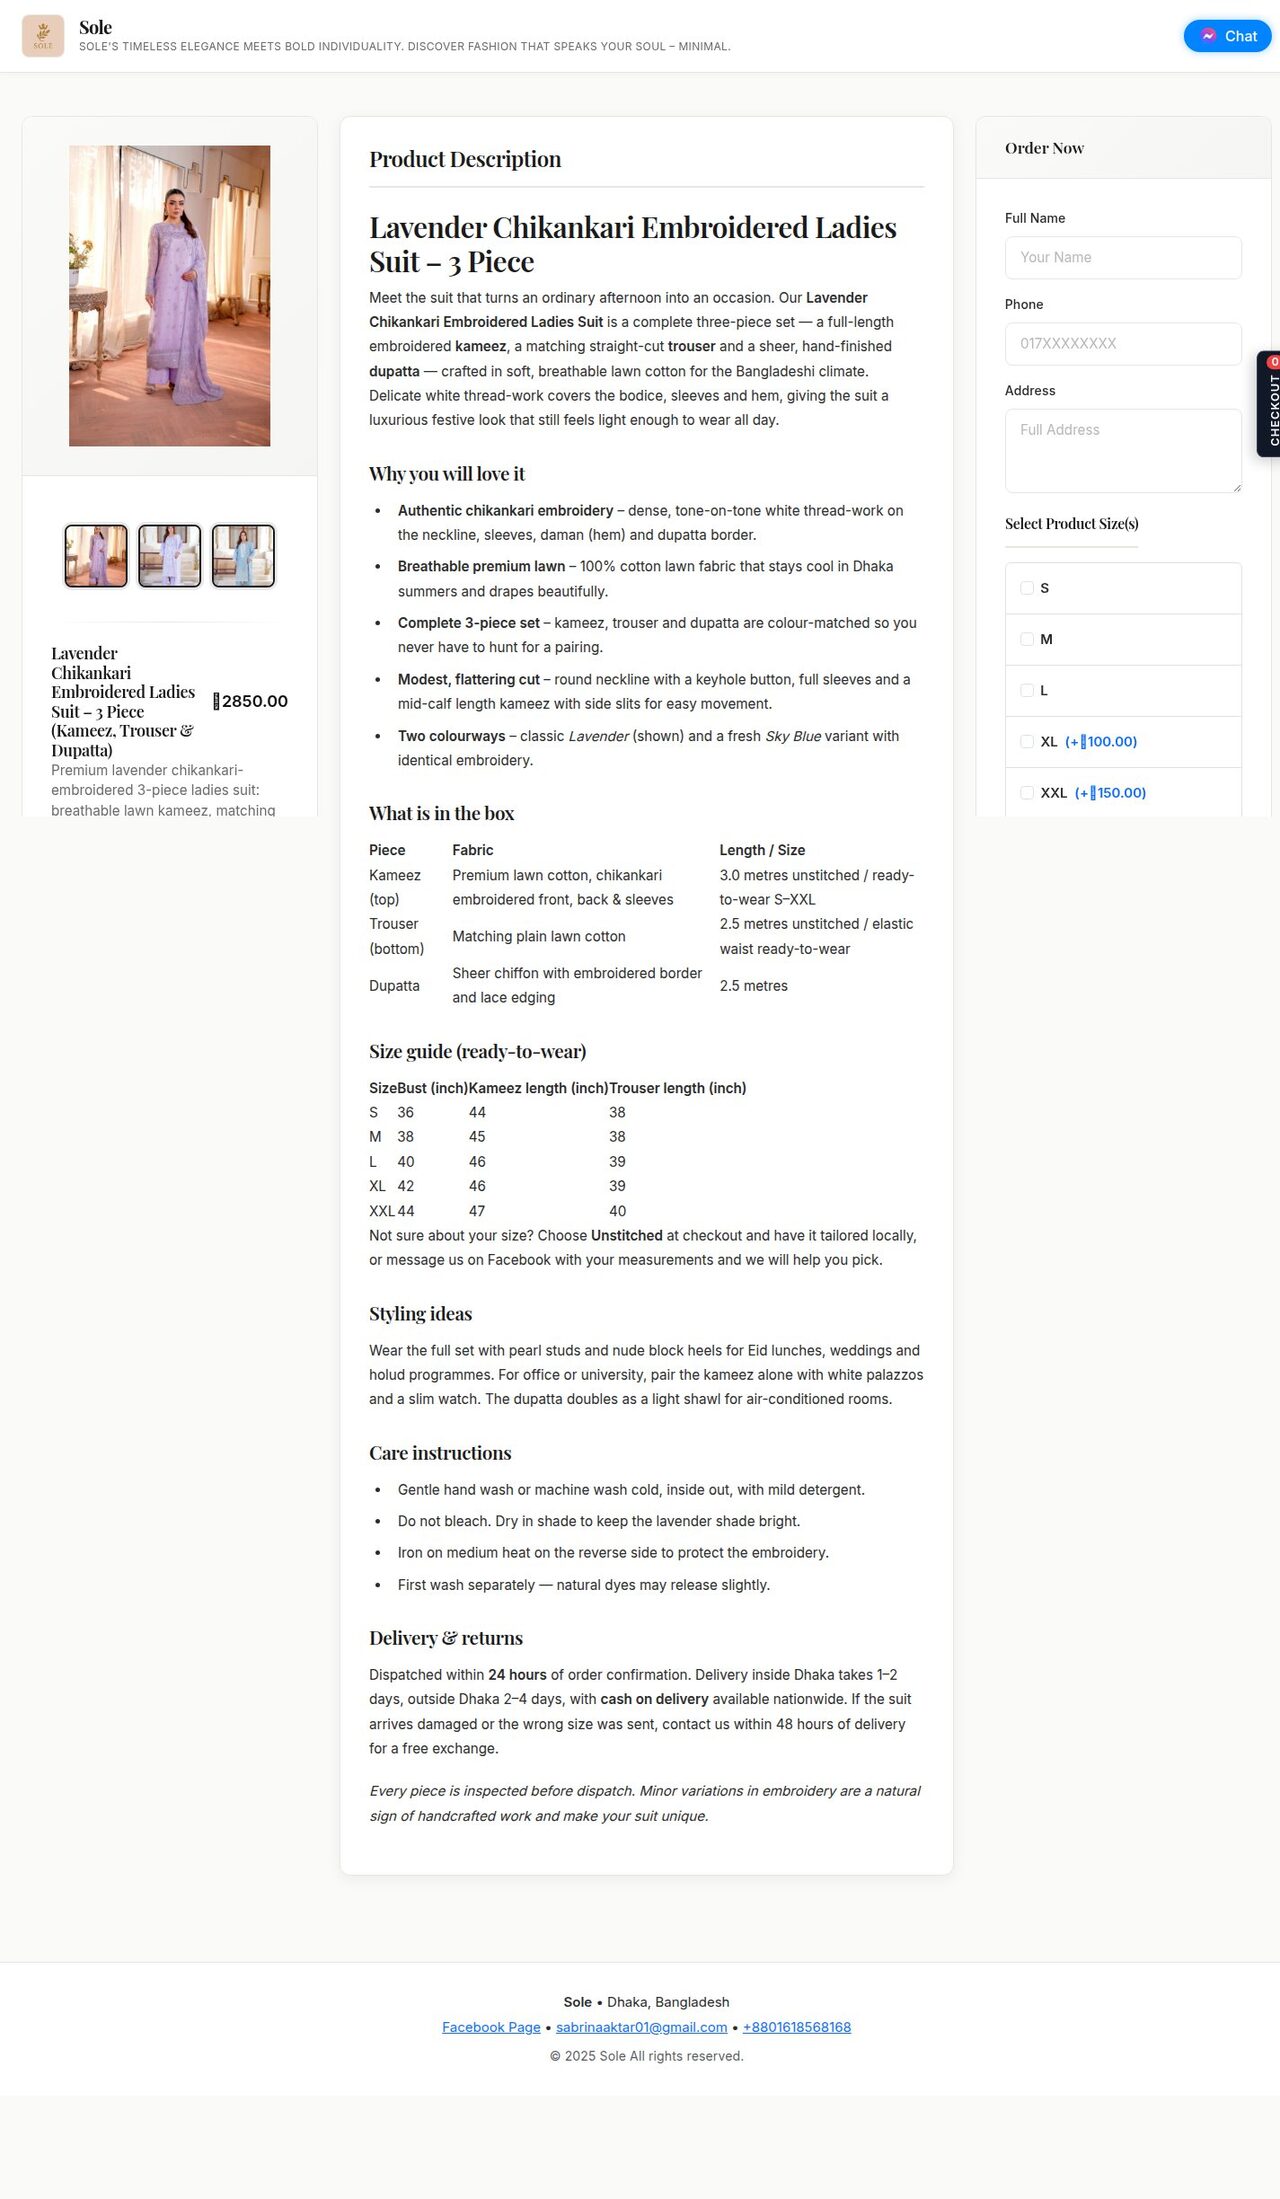
Classic — /buy/lavender-chikankari-ladies-suit
Classic — cart and checkout
Grocery Inspired
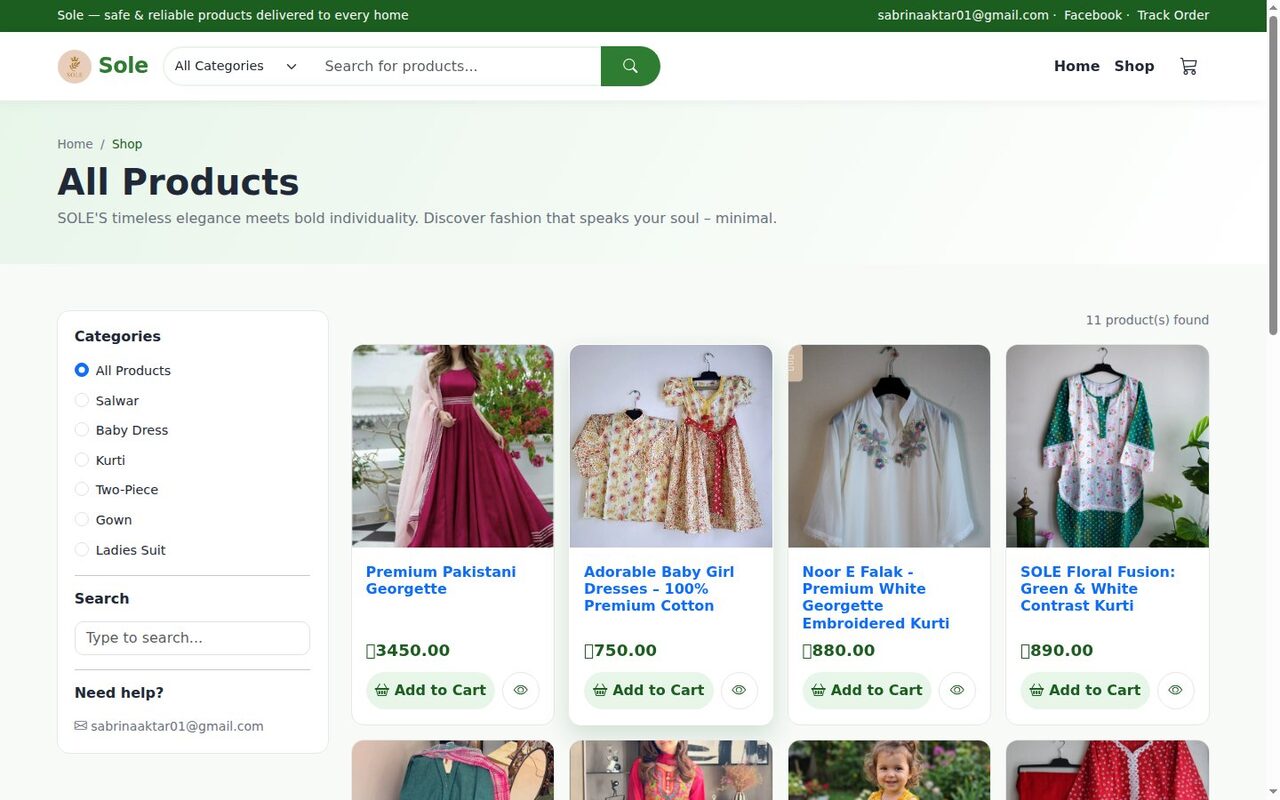
A green marketplace look with a dark top info bar, white cards, big Add to Cart buttons and a clean two-column checkout. Best for food, daily essentials and high-volume catalogues.
Grocery Inspired — home /
Grocery Inspired — /landingpage
Grocery Inspired — product page /lavender-chikankari-ladies-suit
Grocery Inspired — /buy/lavender-chikankari-ladies-suit
Grocery Inspired — cart and checkout
Fashion Luxe
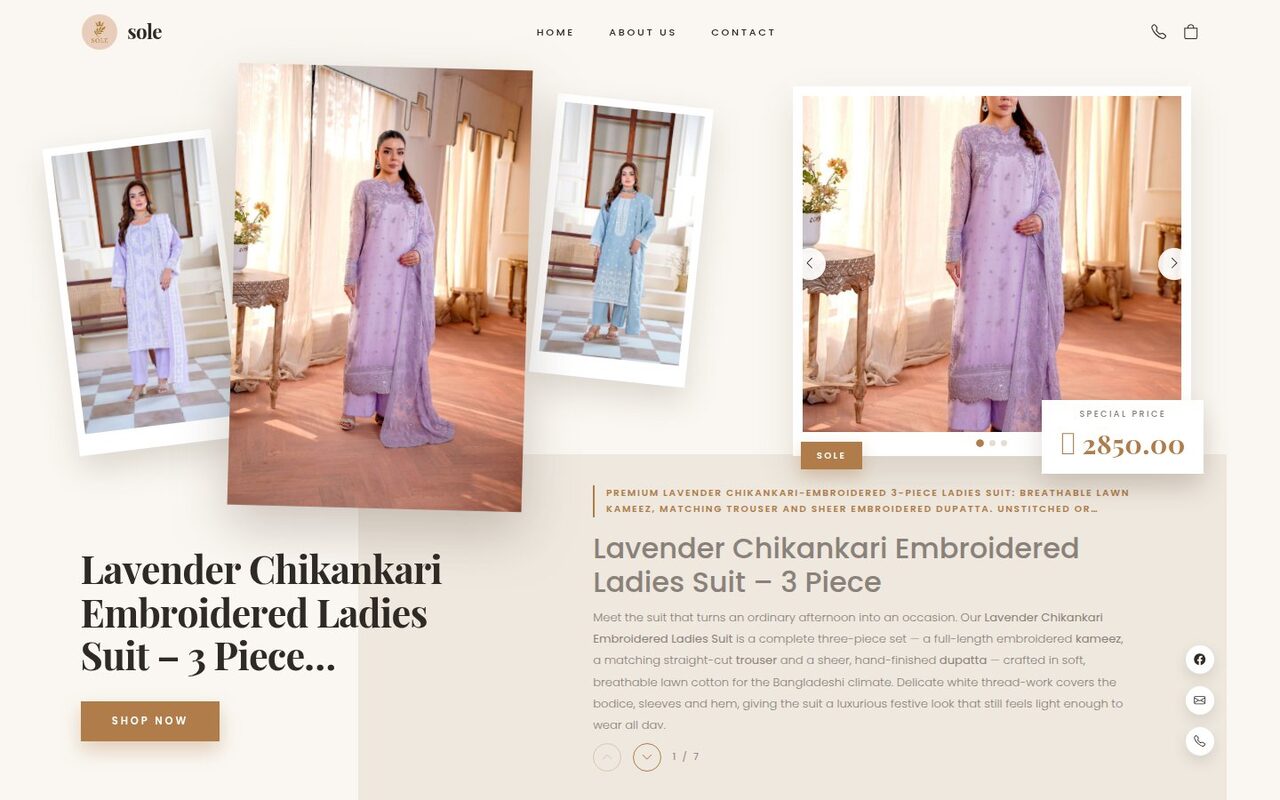
A premium fashion storefront: black-and-gold palette, editorial hero, serif headings, hover-reveal quick-add buttons and a stepped checkout (Cart → Delivery details → Confirmation). Best for clothing, jewellery and lifestyle brands — which is why our ladies-suit shop uses it.
Fashion Luxe — home /
Fashion Luxe — /landingpage
Fashion Luxe — product page /lavender-chikankari-ladies-suit
Fashion Luxe — /buy/lavender-chikankari-ladies-suit
Fashion Luxe — cart and checkout
Tip: Preview first, then apply. Theme changes do not touch your products, prices, slugs or orders — switch as often as you like for seasonal campaigns.
16. Password Reset via OTP
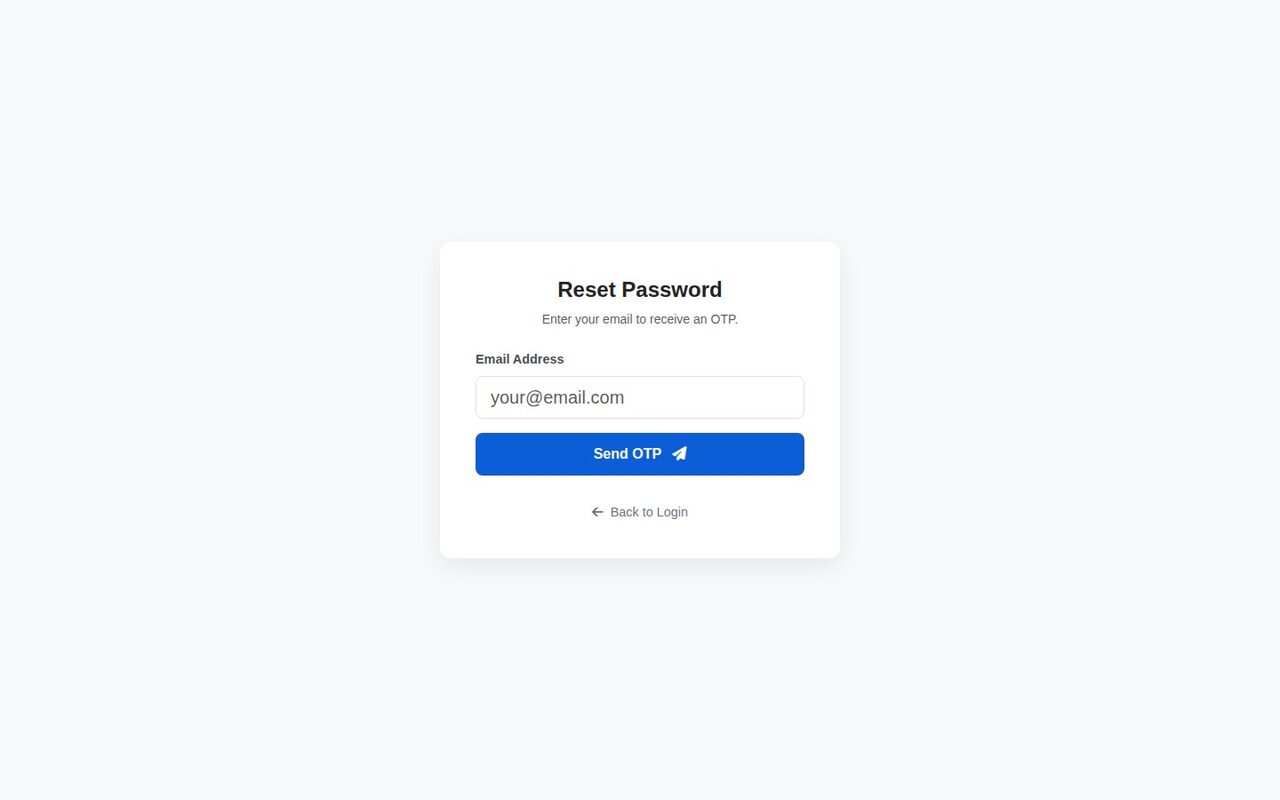
Click Forgot password? under the login form.
- Enter your registered Email Address and click Send OTP.
- Open your inbox, copy the 6-digit code, enter it under Enter OTP Code and click Verify OTP.
- Type a New Password, confirm it and click Change Password. Log in with the new password.
Tip: The OTP email is sent instantly; check spam if you do not see it within a minute. Codes are single-use and expire quickly.
17. Dashboard Overview
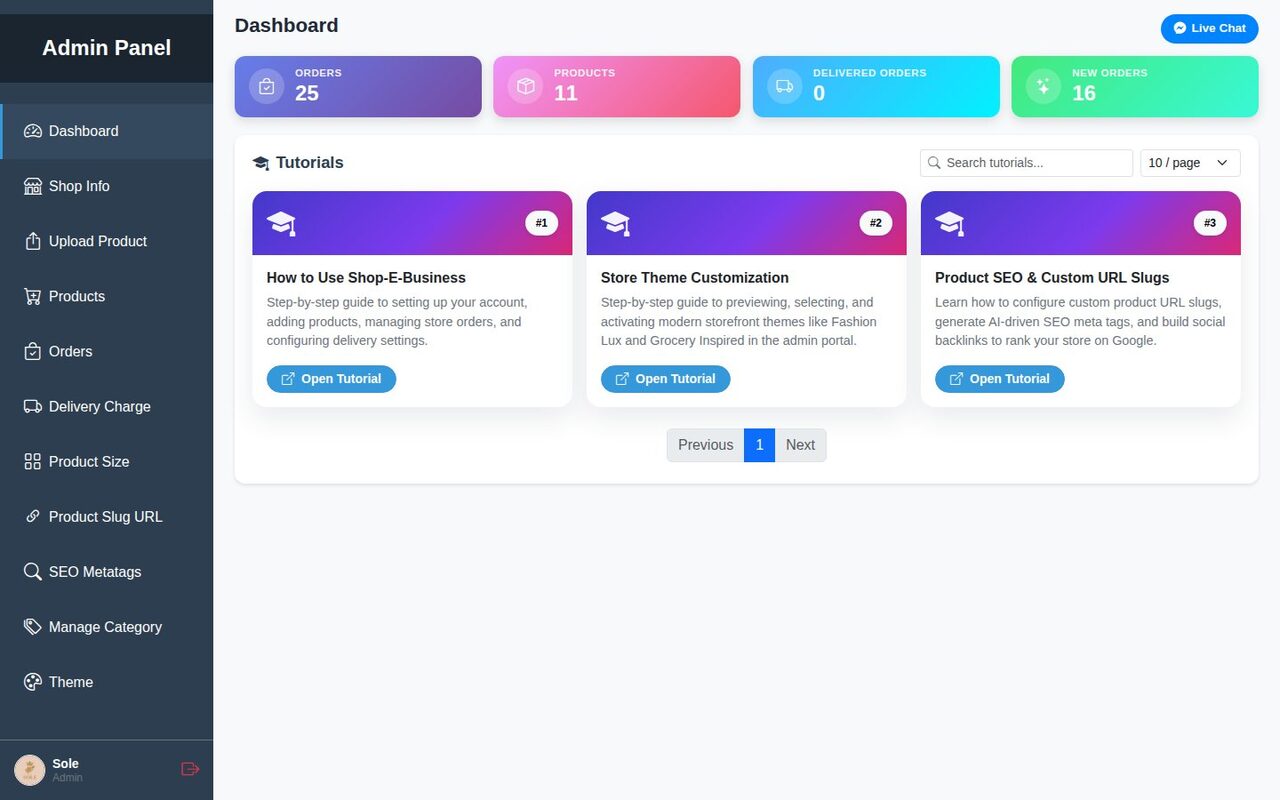
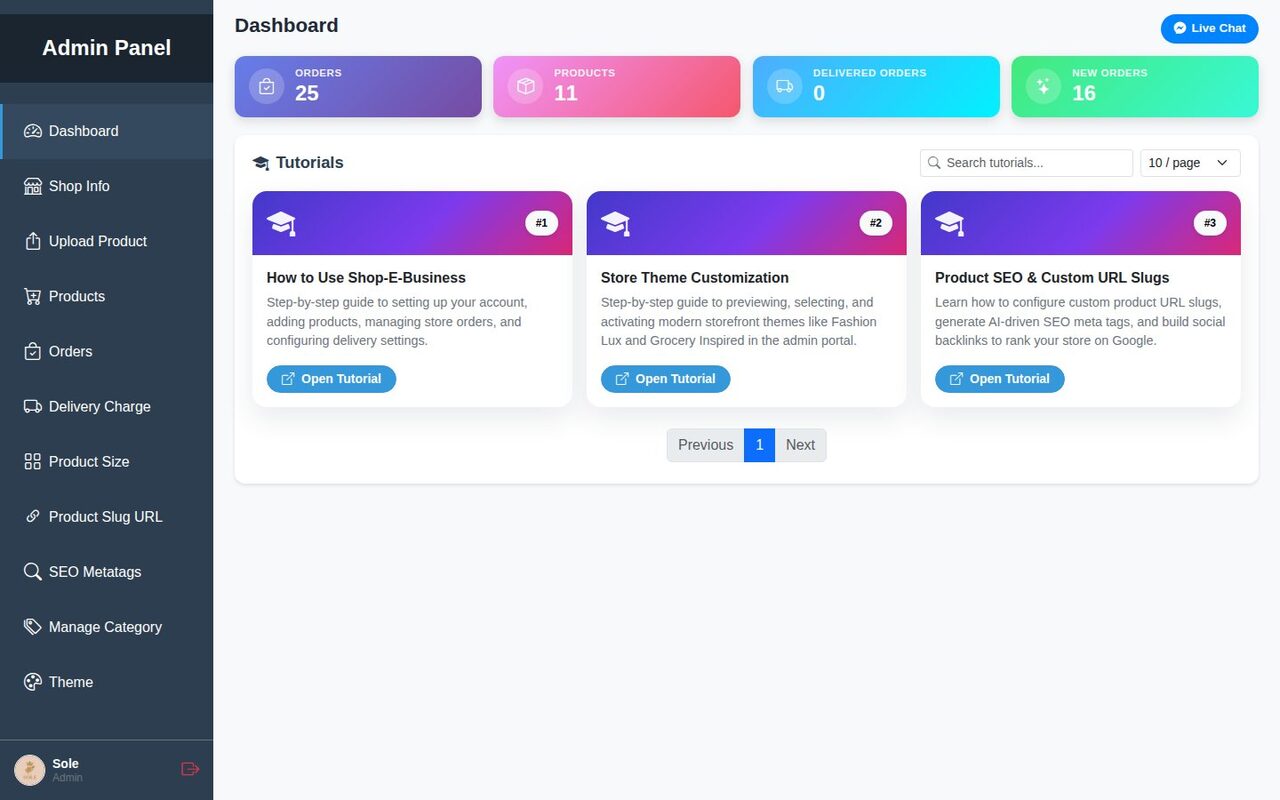
The Dashboard is your home screen after login: live counters for Orders, Products, Deliverable Orders and New Orders, a searchable Tutorials panel with step-by-step guides (using Shop-E-Business, theme customisation, SEO and custom URL slugs), your plan badge and the Live Chat button for support.
18. Logout
Click the red logout icon next to your shop name at the bottom of the sidebar. You are returned to the public home page; log in again any time with your email and password.
Quick Launch Checklist
From zero to first order in about 30 minutes
- Register → Log in → note your trial days
- Shop Info: logo, cover, description, Facebook, address, phone
- Upload Product with a category, 3–5 photos, a long description and a price → mark it Featured
- Product Size, Product Slug URL, SEO Metatags
- Delivery Charge for each shipping zone
- Pick a Theme → share
/landingpageand/buy/{slug}links → confirm orders in Orders
Shop-E-Business-এর সাথে একদম সহজে আপনার ই-কমার্স স্টোর চালু করুন।
আনলিমিটেড প্রোডাক্ট আপলোডসহ সম্পূর্ণ অনলাইন স্টোরফ্রন্ট পাচ্ছেন মাত্র ৪৯৯ টাকা/বছরে, সাথে ৩ দিনের ফ্রি ট্রায়াল।
🎬 নিচের ধাপে ধাপে ভিডিওটি দেখুন — Shop-E-Business -এ কত সহজে আপনার স্টোরফ্রন্ট সেটআপ করা যায়!
এটি শপ-ই-বিজনেস (Shop-E-Business) -এর সম্পূর্ণ, স্ক্রিনশট-সহ ইউজার ম্যানুয়াল। আমরা একজন নতুন আন্তর্জাতিক ব্যবসায়ীর মতো করে পুরো প্ল্যাটফর্মটি ব্যবহার করেছি — Nordic Craft Store নামে একটি নতুন শপ রেজিস্ট্রেশন থেকে শুরু করে হাতে তৈরি সিরামিক মগ বিক্রি, অর্ডার কনফার্ম এবং স্টোরফ্রন্ট থিম পরিবর্তন পর্যন্ত। নিচের প্রতিটি স্ক্রিনশট বাস্তব সেশন থেকে নেওয়া।
আন্তর্জাতিক প্ল্যান · ১০ USD / বছর
একটাই ফ্ল্যাট মূল্য। আনলিমিটেড প্রোডাক্ট, নিজের স্টোর সাবডোমেইন, তিনটি স্টোরফ্রন্ট থিম, SEO টুল, আলাদা /landingpage ও এক-ক্লিক /buy পেজ এবং অর্ডার ম্যানেজমেন্ট। প্রতিটি নতুন শপ ফ্রি ট্রায়াল দিয়ে শুরু হয়, তাই কোনো টাকা দেওয়ার আগেই পুরো ম্যানুয়ালটি অনুসরণ করে দেখতে পারবেন।
এই ম্যানুয়াল কীভাবে পড়বেন। প্রতিটি নম্বরযুক্ত সেকশন প্ল্যাটফর্মের একটি ফিচার, যে ক্রমে আপনি ব্যবহার করবেন। বোল্ড মেনুর নামগুলো অ্যাডমিন সাইডবারে ঠিক এভাবেই দেখবেন: Dashboard, Shop Info, Upload Product, Products, Orders, Delivery Charge, Product Size, Product Slug URL, SEO Metatags, Manage Category, Theme এবং Logout। স্টোরফ্রন্ট URL লেখা হয়েছে yourstore.shopebusiness.com/… আকারে — yourstore-এর জায়গায় আপনার শপ ডোমেইন নাম বসান।
১. নতুন শপ রেজিস্ট্রেশন
Shop-E-Business হোম পেজ খুলুন। হিরো সেকশনে অফারটি দেখানো হয়; Create Account ক্লিক করুন (বা Create Your Shop প্যানেল পর্যন্ত স্ক্রল করুন)।
- Shop Name — আপনার ব্র্যান্ডের নাম, যেটা স্টোরফ্রন্ট হেডারে কাস্টমার দেখবে (যেমন Sabrina Fashion House)।
- Shop Domain Name — ছোট হাতের একটি শব্দ। এটিই আপনার স্থায়ী স্টোর ঠিকানা হবে:
yourstore.shopebusiness.com। টাইপ করার সময়েই খালি আছে কি না চেক হয়। - Email — লগইন ও পাসওয়ার্ড রিসেট OTP-এর জন্য ব্যবহৃত হয়, তাই আসল ইমেইল দিন।
- Password ও Confirm Password — কমপক্ষে ৮ অক্ষর, অক্ষর-সংখ্যা-চিহ্ন মিশিয়ে।
- Register Now ক্লিক করুন। সাথে সাথেই সক্রিয় ট্রায়ালসহ শপ তৈরি হয়ে যায়।
SEO টিপস: ডোমেইন নাম পরে পরিবর্তন করা যায় না এবং প্রতিটি প্রোডাক্ট URL-এ থাকে, তাই ছোট ও ব্র্যান্ডের সাথে মিল রেখে দিন —sole,sole-fashion-store-2026-এর চেয়ে ভালো।
২. অ্যাডমিন প্যানেলে লগইন
উপরের নেভিগেশনে Login ক্লিক করুন, রেজিস্ট্রেশনের Email ও Password দিয়ে Login চাপুন। ফর্মের নিচেই Forgot password? লিংক আছে (দেখুন সেকশন ১৬)।
সফল লগইনের পর আপনি Dashboard-এ পৌঁছে যাবেন। বাম পাশের সাইডবারই আপনার Admin Panel: এই ম্যানুয়ালের প্রতিটি ফিচার এখান থেকে এক ক্লিকে।
৩. ট্রায়াল, সাবস্ক্রিপশন এবং ১০ USD/বছর প্ল্যান
প্রতিটি নতুন শপ সক্রিয় ট্রায়াল নিয়ে শুরু হয়, তাই পুরো সাইডবার (প্রোডাক্ট, অর্ডার, থিম…) সাথে সাথেই পাওয়া যায়। হোম পেজের Pricing সেকশনে আন্তর্জাতিক Premium Shop প্ল্যান $10 / year: আনলিমিটেড প্রোডাক্ট, কাস্টম অর্ডার লিংক, অর্ডার ম্যানেজমেন্ট ড্যাশবোর্ড ও প্রায়োরিটি সাপোর্ট। শুরু করতে কোনো কার্ড লাগে না।
অ্যাডমিন প্যানেলের উপরে-ডানে ব্যাজে বর্তমান প্ল্যান ও বাকি দিন দেখায়। ট্রায়াল শেষ হলে লাইসেন্স কি সক্রিয় করার আগ পর্যন্ত শুধু Dashboard ও Shop Info দেখা যায় — প্রোডাক্ট ও অর্ডার সংরক্ষিত থাকে, কিছুই মুছে যায় না।
৪. Shop Info — ব্র্যান্ডিং
Shop Info-তে যান। প্রতিটি থিমের স্টোরফ্রন্ট হেডার, হিরো এরিয়া ও ফুটারে কাস্টমার যা দেখে, সব এই পেজ থেকে নিয়ন্ত্রিত হয়।
- Shop Logo — স্কয়ার PNG/JPG। স্টোরফ্রন্ট হেডার ও চেকআউট পেজে দেখায়।
- Cover Photo — প্রশস্ত ব্যানার, স্টোরফ্রন্ট হোম ও
/landingpage-এর হিরো ছবি হিসেবে ব্যবহৃত হয়। - Shop Domain — আপনার
yourstore.shopebusiness.comঠিকানার রিড-অনলি রিমাইন্ডার। - Description — আপনি কী বিক্রি করেন, এক-দুই লাইনে। শপ নামের নিচে দেখায় এবং ডিফল্ট মেটা ডেসক্রিপশন হিসেবে ব্যবহৃত হয়।
- Facebook Page Link — স্টোরফ্রন্টের Facebook ও Chat বাটন এটি ব্যবহার করে।
- Address ও Phone Number — ফুটার/কন্টাক্ট এরিয়া ও উপরের ইনফো বারে দেখায়।
- Save Shop Info ক্লিক করুন। উপরের View ও Share বাটনে লাইভ স্টোর লিংক খোলা বা শেয়ার করা যায়।
টিপস: ফোন নম্বর আন্তর্জাতিক ফরম্যাটে দিন (যেমন +880 …) যাতে বিদেশি কাস্টমার স্টোরফ্রন্ট থেকেই কল বা WhatsApp করতে পারে।
৫. Manage Category
Upload Product ফর্মের ভেতরেই ক্যাটাগরি তৈরি করা যায়: Select Category ড্রপডাউন খুলে নতুন নাম টাইপ করুন (আমরা লিখেছি Ladies Suit) এবং Add “Ladies Suit” ক্লিক করুন। ক্যাটাগরি সাথে সাথে সেভ হয় ও প্রোডাক্টের জন্য সিলেক্ট হয়ে যায়।
Manage Category পেজে প্রতিটি ক্যাটাগরির ছবি, নাম, বিবরণ ও প্রোডাক্ট সংখ্যা দেখায়। এখানে নাম পরিবর্তন, বিবরণ যোগ ও ক্যাটাগরি ছবি আপলোড করতে পারবেন — এই ছবিগুলো স্টোরফ্রন্টের Shop by Category সেকশন ও /landingpage-এ দেখায়।
টিপস: ৩–৮টি বড় ক্যাটাগরি রাখুন। অনেক ছোট ছোট ক্যাটাগরি ব্রাউজিং কঠিন করে এবং SEO দুর্বল করে।
৬. Upload Product (বড় বিবরণসহ)
Upload Product-এ যান। আমরা একটি আসল প্রোডাক্ট আপলোড করেছি — Lavender Chikankari Embroidered Ladies Suit – 3 Piece (Kameez, Trouser & Dupatta) — এই তিনটি ছবি দিয়ে:
ফর্মটি উপর থেকে নিচে পূরণ করুন:
- Title — নির্দিষ্ট ও কীওয়ার্ড-সমৃদ্ধ: কাপড়, স্টাইল, পিস ও রং। আমাদের টাইটেলে Chikankari, Embroidered, Ladies Suit ও 3 Piece আছে — ঠিক যা ক্রেতারা সার্চ করে।
- Short Description — সর্বোচ্চ ২৫০ অক্ষর। প্রোডাক্ট কার্ড,
/buyপেজ ও কার্টে দেখায়, তাই এক শক্তিশালী বাক্যে প্রোডাক্টটি বোঝান। - Select Category — বিদ্যমান ক্যাটাগরি বেছে নিন বা সাথে সাথে নতুন যোগ করুন (সেকশন ৫)।
- Long Description — রিচ-টেক্সট এডিটর। এটি বড় করে লিখুন। লং ডেসক্রিপশন প্রোডাক্ট পেজে (
/Product/View/{id}বা/{slug-url}) ও/buyপেজে পুরোটা দেখায়, তাই বিস্তারিত বিবরণই এই পেজগুলোকে প্রফেশনাল দেখায় ও সার্চে র্যাংক করায়। আমরা হেডিং ও বুলেট লিস্টসহ সাতটি সেকশন লিখেছি:- প্রোডাক্ট ওভারভিউ — এটি কী এবং কাদের জন্য
- এমব্রয়ডারি ও কাপড় — নিঃশ্বাস-নেওয়া লন কটনে হাতে ফিনিশ করা চিকনকারি
- সম্পূর্ণ ৩-পিস সেট — কামিজ, ট্রাউজার ও দোপাট্টার মাপ
- সাইজ গাইড — S থেকে XXL ও Unstitched অপশন
- স্টাইলিং আইডিয়া — ক্যাজুয়াল, অফিস ও উৎসব
- যত্নের নির্দেশনা — ঠান্ডা পানিতে হাতে ধোয়া, ছায়ায় শুকানো, উল্টো করে ইস্ত্রি
- ডেলিভারি, ক্যাশ অন ডেলিভারি ও রিটার্ন
- Price ও Product Currency — আমরা 2850 ও BDT (৳) দিয়েছি; স্টোরফ্রন্টের সব জায়গায় মূল্যের সাথে এই চিহ্ন দেখায়।
- Photos — সর্বোচ্চ ৫টি ছবি। প্রতিটি অতিরিক্ত ছবির জন্য Add More (max 5) ক্লিক করে একটিকে Cover Photo টিক দিন; কভারটি প্রোডাক্ট কার্ড ও গ্যালারির প্রথম ছবি হিসেবে ব্যবহৃত হয়।
- Related Products (ঐচ্ছিক) — প্রোডাক্টের নিচে দেখানো ক্রস-সেল আইটেম।
- Save Product ক্লিক করুন।
সেভ করার পর আপনি Products লিস্টে ফিরে যাবেন, যেখানে নতুন সুটটি কভার ছবি, মূল্য ও স্ট্যাটাসসহ উপরে দেখায়।
SEO টিপস: লং ডেসক্রিপশন আগে মানুষের জন্য লিখুন — হেডিং, ছোট প্যারাগ্রাফ ও বুলেট লিস্ট। ৩০০+ শব্দের ইউনিক, সুগঠিত টেক্সট সার্চ ইঞ্জিন পুরস্কৃত করে, আর সম্পূর্ণ সাইজ গাইড ও যত্নের সেকশন পড়া কাস্টমার কম রিটার্ন করে।
৭. Product Size / ভ্যারিয়েন্ট
Product Size-এ গিয়ে Choose Product to Configure-এ প্রোডাক্ট বেছে নিন। বেস প্রাইস দেখানো হয়; প্রতিটি ভ্যারিয়েন্টের Size / Variant Name ও Increased Price (+) দিয়ে যোগ করুন। বেস প্রাইসে বিক্রি হওয়া সাইজে 0, সারচার্জে ধনাত্মক এবং ডিসকাউন্টে ঋণাত্মক সংখ্যা দিন।
আমরা S, M, L (+0), XL (+৳100), XXL (+৳150) ও Unstitched (−৳200) যোগ করেছি। টেবিলে প্রতিটি ভ্যারিয়েন্টের চূড়ান্ত মূল্য দেখায়, এবং এগুলো প্রোডাক্ট পেজ, /buy পেজ ও চেকআউটে বাধ্যতামূলক ড্রপডাউন হয়ে যায়।
৮. Products লিস্ট ও Product Status
Products পেজে প্রতিটি প্রোডাক্টের কভার ছবি, টাইটেল, মূল্য, Product Status রেডিও বাটন ও অ্যাকশন আইকন: এডিট, স্টোরফ্রন্টে দেখা, লিংক কপি, শেয়ার ও ডিলিট। বড় ক্যাটালগের জন্য সার্চ বক্স ও Rows per page ব্যবহার করুন।
Product status এক ক্লিকে পরিবর্তন হয়: Normal, Featured, Latest বা Premium। আমরা সুটটি Featured করেছি, যা এটিকে স্টোরফ্রন্ট হোম ও /landingpage-এর Featured Products ব্লকে রাখে।
৯. Product Slug URL — /Product/View/{id} বনাম /{slug-url}
প্রতিটি প্রোডাক্ট সাথে সাথেই সংখ্যাভিত্তিক ঠিকানায় পাওয়া যায়, যেমন sole.shopebusiness.com/Product/View/970। এটি কাজ করে, কিন্তু পড়ার যোগ্য URL ভালো র্যাংক করে ও শেয়ারে বিশ্বাসযোগ্য দেখায়। Product Slug URL-এ গিয়ে প্রোডাক্ট বেছে নিন, lavender-chikankari-ladies-suit-এর মতো slug লিখুন ও Save Slug ক্লিক করুন।
সেভ হলে পেজে Current Slug URL দেখায়। প্রোডাক্টটি এখন sole.shopebusiness.com/lavender-chikankari-ladies-suit ঠিকানায়, এবং একই slug এক-ক্লিক বাই পেজ sole.shopebusiness.com/buy/lavender-chikankari-ladies-suit-ও চালায় (সেকশন ১৪)। পুরনো সংখ্যাভিত্তিক URL-ও কাজ করতে থাকে।
Slug নিয়ম: শুধু ছোট হাতের অক্ষর, সংখ্যা ও একক হাইফেন; ৩–৩০০ অক্ষর; শুরুতে/শেষে হাইফেন নয়; কমপক্ষে একটি অক্ষর থাকতে হবে। শপে প্রতিটি slug ইউনিক হতে হবে এবং admin, product, order, landingpage, checkout-এর মতো সংরক্ষিত শব্দ দিয়ে শুরু করা যাবে না।
১০. SEO Metatags
SEO Metatags-এ যান। Choose Page-এ শপ হোম পেজ বা নির্দিষ্ট প্রোডাক্ট বেছে নিন; Selected Page URL দেখানো হয় যাতে আপনি জানেন কোন পেজ অপটিমাইজ করছেন। Keywords (কমা দিয়ে) ও প্রায় ১৫০–১৬০ অক্ষরের Description লিখুন, বা Use Auto Generated চেপে টাইটেল ও শর্ট ডেসক্রিপশন থেকে পূরণ করুন। Save Metatags ক্লিক করুন।
সেভ করা মেটাট্যাগ ওই পেজের <title>, <meta name="description"> ও Open Graph ট্যাগ হয়ে যায় — যা Google সার্চ রেজাল্টে এবং Facebook/WhatsApp লিংক শেয়ারে দেখায়।
SEO টিপস: সেকশন ৬, ৯ ও ১০ একসাথে করুন: বড় বিবরণ, পড়ার যোগ্য slug ও কীওয়ার্ড-সমৃদ্ধ মেটা ডেসক্রিপশন — প্রোডাক্ট পেজ ইনডেক্স ও ক্লিক পাওয়ার দ্রুততম উপায়।
১১. Delivery Charge
Delivery Charge-এ যান। প্রতিটি সারি একটি শিপিং অপশন, যা কাস্টমার চেকআউটে বেছে নেয়: একটি Message (যেমন Inside Dhaka, Outside Dhaka, Outside Bangladesh), Charge ও Delivery Order Currency। Save ক্লিক করুন এবং প্রতিটি জোনের জন্য পুনরাবৃত্তি করুন। Action কলামের টগল দিয়ে কোনো অপশন না মুছে সাময়িকভাবে লুকান।
১২. Orders ও অর্ডার স্ট্যাটাস
প্রতিটি চেকআউট সাথে সাথে Orders-এ দেখায় — প্রোডাক্ট, সাইজ, পরিমাণ, কাস্টমারের নাম, ফোন, ঠিকানা, নোট ও মূল্যের সারসংক্ষেপ (আইটেম + শিপিং = মোট)। গোপনীয়তার জন্য স্ক্রিনশটে কাস্টমারের তথ্য ব্লার করা।
ডানদিকের রেডিও বাটন দিয়ে স্ট্যাটাস পরিবর্তন করুন — Initial → Confirmed → Packed → Shipped → Delivered, অথবা Cancelled। পরিবর্তন সাথে সাথে সেভ হয়। All Statuses ফিল্টার ও সার্চ বক্স দিয়ে দ্রুত অর্ডার খুঁজুন, যেমন যেগুলো এখনও প্যাক হওয়ার অপেক্ষায়।
টিপস: অর্ডারগুলো ক্যাশ-অন-ডেলিভারি ধাঁচের — কোনো কার্ড গেটওয়ে দরকার নেই। ফোন বা Messenger-এ কনফার্ম করে প্যাক ও শিপ করার সাথে সাথে স্ট্যাটাস এগিয়ে নিন।
১৩. কাস্টমার স্টোরফ্রন্ট: হোম, /landingpage, প্রোডাক্ট পেজ, কার্ট ও চেকআউট
কাস্টমার কখনও অ্যাডমিন প্যানেল দেখে না। তারা yourstore.shopebusiness.com-এ গিয়ে একটি দ্রুত, মোবাইল-ফার্স্ট শপ পায়। নিচে বর্তমানে অ্যাপ্লাই করা থিম (Fashion Luxe)-এ স্টোরফ্রন্ট; সেকশন ১৫-এ Classic ও Grocery Inspired-এ একই পেজগুলো।
স্টোরফ্রন্ট হোম — /
হোম পেজ হলো পুরো ক্যাটালগ: ক্যাটাগরি সাইডবার, সার্চ এবং প্রোডাক্ট গ্রিড, যেখানে প্রতিটি কার্ডে কভার ছবি, টাইটেল, মূল্য ও দ্রুত add to cart বাটন থাকে।
ল্যান্ডিং পেজ — /landingpage
প্রতিটি শপের একটি মার্কেটিং ল্যান্ডিং পেজও আছে: yourstore.shopebusiness.com/landingpage। এটি আপনার Cover Photo-কে হিরো হিসেবে ব্যবহার করে, শপ বিবরণ, Shop the Collection ও Browse Categories বাটন, ট্রাস্ট ব্যাজ (ফ্রি ডেলিভারি, সিকিউর চেকআউট, সহজ রিটার্ন), ক্যাটাগরি টাইল এবং Featured ও Latest প্রোডাক্ট দেখায়। Facebook বায়ো, Instagram ও বিজ্ঞাপনে এই লিংকটি দিন — এটি ভিজিটরকে ক্রেতায় রূপান্তরের জন্য, আর / ব্রাউজিংয়ের জন্য।
প্রোডাক্ট পেজ — /{slug-url} বা /Product/View/{id}
প্রোডাক্ট পেজে ফটো গ্যালারি, মূল্য, সাইজ ড্রপডাউন, Order Now ও Add to Cart বাটন এবং — সবচেয়ে গুরুত্বপূর্ণ — Description ট্যাবে আপনার পুরো লং ডেসক্রিপশন, তারপর Details ও Delivery। এজন্যই সেকশন ৬-এ বড় বিবরণ লিখতে বলা হয়েছে: নিচের পেজটি পুরোটাই এডিটরে লেখা টেক্সট দিয়ে ভরা।
কার্টে যোগ
কার্ডের কার্ট আইকনে (বা প্রোডাক্ট পেজের Add to Cart-এ) ক্লিক করলে আইটেম যোগ হয় ও কনফার্মেশন টোস্ট দেখায়; হেডারের কার্ট কাউন্টার সাথে সাথে আপডেট হয়।
চেকআউট — /Order/Checkout
চেকআউট পেজে Full Name, Phone Number, Full Address, একটি Shipping Method (সেকশন ১১-এর ডেলিভারি চার্জ) ও ঐচ্ছিক Note চাওয়া হয়। কাস্টমার প্রতিটি আইটেমের সাইজ ও পরিমাণ বেছে নেয়, Order Summary-তে লাইভ সাবটোটাল, শিপিং ও মোট দেখে Place Order ক্লিক করে। অর্ডার সাথে সাথে আপনার Orders পেজে আসে।
১৪. /buy পেজ — এক-ক্লিক অর্ডার
প্রতিটি প্রোডাক্টের একটি আলাদা একক-প্রোডাক্ট অর্ডার পেজও আছে: yourstore.shopebusiness.com/buy/{slug-url} (বা /buy/{id})। প্রোডাক্ট পেজের মতো নয়, /buy পেজে কোনো ক্যাটালগ নেভিগেশন নেই: শুধু গ্যালারি, টাইটেল, শর্ট ডেসক্রিপশন, লং ডেসক্রিপশন, সাইজ সিলেক্টর এবং একই স্ক্রিনে Order Now / Buy Now ফর্ম। এটি বিজ্ঞাপন ও Messenger-এ বিক্রির জন্য তৈরি — কাস্টমারকে sole.shopebusiness.com/buy/lavender-chikankari-ladies-suit পাঠান, তারা অন্য প্রোডাক্টে বিভ্রান্ত না হয়ে এক মিনিটের মধ্যে অর্ডার করতে পারবে।
কোন লিংক শেয়ার করবেন? ব্র্যান্ডের জন্য /landingpage (বায়ো, পুরো শপের বিজ্ঞাপন) · অর্গানিক সার্চ ও প্রোডাক্ট রিসার্চের জন্য /{slug-url} · একক-প্রোডাক্ট বিজ্ঞাপন বা সিদ্ধান্ত নেওয়া কাস্টমারের জন্য /buy/{slug-url}।
১৫. থিম: Classic, Grocery Inspired ও Fashion Luxe
Theme-এ যান। তিনটি স্টোরফ্রন্ট ডিজাইন আছে, প্রতিটিতে Preview ও Apply বাটন; সক্রিয় থিমটি Active চিহ্নিত।
Preview নির্বাচিত থিমে আপনার স্টোরফ্রন্ট ৫ মিনিটের জন্য খোলে — শুধু আপনার ব্রাউজারে, কাস্টমার লাইভ থিমই দেখতে থাকে। Apply করলে সবার জন্য সাথে সাথে লাইভ হয়। প্রতিটি থিম একই চারটি পেজ রেন্ডার করে — হোম, /landingpage, প্রোডাক্ট পেজ ও /buy — তাই কনটেন্ট বদলায় না, শুধু ডিজাইন।
Classic
ডিফল্ট লুক: হালকা সারফেস, নীল ক্যাটাগরি বার, ক্যাটাগরি সাইডবার ও প্রোডাক্ট গ্রিড। জেনারেল স্টোর ও ইলেকট্রনিক্সের জন্য সেরা।
Classic — হোম /
Classic — /landingpage
Classic — প্রোডাক্ট পেজ /lavender-chikankari-ladies-suit
Classic — /buy/lavender-chikankari-ladies-suit
Classic — কার্ট ও চেকআউট
Grocery Inspired
সবুজ মার্কেটপ্লেস লুক, গাঢ় টপ ইনফো বার, সাদা কার্ড, বড় Add to Cart বাটন ও পরিচ্ছন্ন দুই-কলাম চেকআউট। খাবার, নিত্যপ্রয়োজনীয় পণ্য ও বড় ক্যাটালগের জন্য সেরা।
Grocery Inspired — হোম /
Grocery Inspired — /landingpage
Grocery Inspired — প্রোডাক্ট পেজ /lavender-chikankari-ladies-suit
Grocery Inspired — /buy/lavender-chikankari-ladies-suit
Grocery Inspired — কার্ট ও চেকআউট
Fashion Luxe
প্রিমিয়াম ফ্যাশন স্টোরফ্রন্ট: কালো-সোনালি প্যালেট, এডিটোরিয়াল হিরো, সেরিফ হেডিং, হোভারে দেখা যাওয়া কুইক-অ্যাড বাটন ও ধাপে ধাপে চেকআউট (Cart → Delivery details → Confirmation)। পোশাক, জুয়েলারি ও লাইফস্টাইল ব্র্যান্ডের জন্য সেরা — এজন্যই আমাদের লেডিস-সুট শপ এটি ব্যবহার করে।
Fashion Luxe — হোম /
Fashion Luxe — /landingpage
Fashion Luxe — প্রোডাক্ট পেজ /lavender-chikankari-ladies-suit
Fashion Luxe — /buy/lavender-chikankari-ladies-suit
Fashion Luxe — কার্ট ও চেকআউট
টিপস: আগে প্রিভিউ, তারপর অ্যাপ্লাই। থিম পরিবর্তনে প্রোডাক্ট, মূল্য, slug বা অর্ডারে কোনো প্রভাব পড়ে না — সিজনাল ক্যাম্পেইনের জন্য যতবার খুশি পরিবর্তন করুন।
১৬. OTP দিয়ে পাসওয়ার্ড রিসেট
লগইন ফর্মের নিচে Forgot password? ক্লিক করুন।
- রেজিস্টার্ড Email Address দিয়ে Send OTP ক্লিক করুন।
- ইনবক্স খুলে ৬-ডিজিটের কোড কপি করুন, Enter OTP Code-এ দিয়ে Verify OTP ক্লিক করুন।
- New Password লিখুন, কনফার্ম করুন এবং Change Password ক্লিক করুন। নতুন পাসওয়ার্ড দিয়ে লগইন করুন।
টিপস: OTP ইমেইল সাথে সাথে পাঠানো হয়; এক মিনিটের মধ্যে না পেলে স্প্যাম ফোল্ডার দেখুন। কোড একবারই ব্যবহারযোগ্য এবং দ্রুত মেয়াদ শেষ হয়।
১৭. Dashboard ওভারভিউ
লগইনের পর Dashboard আপনার হোম স্ক্রিন: Orders, Products, Deliverable Orders ও New Orders-এর লাইভ কাউন্টার, ধাপে ধাপে গাইডসহ সার্চযোগ্য Tutorials প্যানেল (শপ-ই-বিজনেস ব্যবহার, থিম কাস্টমাইজেশন, SEO ও কাস্টম URL slug), আপনার প্ল্যান ব্যাজ ও সাপোর্টের জন্য Live Chat বাটন।
১৮. Logout
সাইডবারের নিচে শপ নামের পাশের লাল লগআউট আইকনে ক্লিক করুন। আপনি পাবলিক হোম পেজে ফিরে যাবেন; ইমেইল ও পাসওয়ার্ড দিয়ে যে কোনো সময় আবার লগইন করুন।
দ্রুত লঞ্চ চেকলিস্ট
শূন্য থেকে প্রথম অর্ডার — প্রায় ৩০ মিনিটে
- রেজিস্টার → লগইন → ট্রায়ালের দিন দেখে নিন
- Shop Info: লোগো, কভার, বিবরণ, Facebook, ঠিকানা, ফোন
- Upload Product — ক্যাটাগরি, ৩–৫টি ছবি, বড় বিবরণ ও মূল্যসহ → Featured করুন
- Product Size, Product Slug URL, SEO Metatags
- প্রতিটি শিপিং জোনের জন্য Delivery Charge
- একটি Theme বেছে নিন →
/landingpageও/buy/{slug}লিংক শেয়ার করুন → Orders-এ অর্ডার কনফার্ম করুন